Welcome to Part 1 of my Wheels and Tires guide. In this section, I will discuss how to identify and read tires and wheels, including understanding wheels and how they fit, how to read the numbers and letters on tires, and the importance of choosing the right tires for your vehicle.
In Part 2 I will discuss a wheel and tire fitment guide for 2004-2006 Pontiac GTO’s including wheel and tire set up for daily driving, drag racing, staggering, and lowered vehicles.
Even though this guide’s main focus is on the 5th generation Pontiac GTO, this guide can be a great reference for any vehicle. The information below is universal and is used by every wheel and tire company around the globe.
LET’S GET STARTED
Tires and wheels are an often talked about subject. Most Pontiac GTO owners, and most car owners for that fact, want to know which tires and wheels they should put on their vehicle. Depending on what you are looking to accomplish, those questions will vary.
Car enthusiasts will often look for wider tires, lower-profile tires, tires that fit oversized wheels for the “large” rim look, and more. Maybe you just want a better-performing tire for all weather conditions and/or less road noise or a tire that really sticks to the pavement to handle higher horsepower vehicles. Whatever your needs are, I am going to do my best to try to answer all of these questions.
For the guide below, I have compiled the best information I could find across the web using various sources to bring you the best possible information on the subject to one page. If you have any further questions or comments, or would like to add more information to this subject, please leave a comment below or use the “Contact” form found here.
To get started, let’s look at what tires and wheels come stock from the factory for the 2004-2006 Pontiac GTO.
2004 Pontiac GTO Factory Wheels & Tires:
| Diameter | Width | Bolt Pattern | Offset | Tire Size |
| 17″ Aluminum Mag Wheels (inches) |
8″ (inches) |
5x120mm (millimeters) |
+48mm (millimeters) |
245/45/17 |
2005-2006 Pontiac GTO Factory Wheels & Tires:
| Diameter | Width | Bolt Pattern | Offset | Tire Size |
| 18″ Aluminum Mag Wheels (inches) |
8″ (inches) |
5x120mm (millimeters) |
+48mm (millimeters) |
235/40/18 |
Now the big question is, what do all those numbers mean?
WHEEL SIZE
The wheel size is the diameter of the wheel (rim) measured in inches across the wheel. Measuring in a straight line from one edge of the wheel to directly across the wheel to the other edge. This measurement is for the wheel only. You do not include the tire, only measure the wheel (rim). This measurement is always done using the Imperial measurement of inches. See the diagram below:
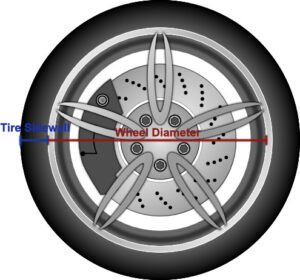
The bigger the diameter, the bigger the wheel. Easy right?
WHEEL WIDTH
The width of the wheel is measured across from bead seat to bead seat. Accurate wheel width measurement is done with the wheel only, no tire mounted. Measurement does not include the outer lip of the wheel. Measure the inside of the wheel lip where the tire will seal to the rim on the inside of the wheel outer lip. This measurement is usually done in Imperial measurement of inches. A few wheel companies may use the metric system of millimeters which can easily be converted to inches and vice versa. Use the conversion tables below to convert inches to millimeters or millimeters to inches. See the diagram below to view how to measure wheel width.
| Inches to Millimeters: | Millimeters to Inches: |
The wider the wheel width, the wider a tire you can put on the wheel. Piece of cake right? Wrong! Keep reading.
BOLT PATTERN
The 5th generation Pontiac GTO’s were built in Australia which uses the metric system for units of measurement. The first number is the number of wheel studs used, the second number is the diameter of an imaginary circle formed by the centers of the wheel lugs. The number will look like this: 5×120. American vehicles or vehicles using the Imperial measurement system will use inches, looking like this: 5×4.75. To get the first number, simply count how many wheel studs are used to hold the tire on. Getting the second number on a 5 bolt lug pattern is a little more complicated. You are measuring from the back of one wheel stud to the center of the furthest wheel stud. Convert inches to millimeters using the conversion widget above in the wheel width section. Use the diagram below to see the correct way to measure bolt pattern:
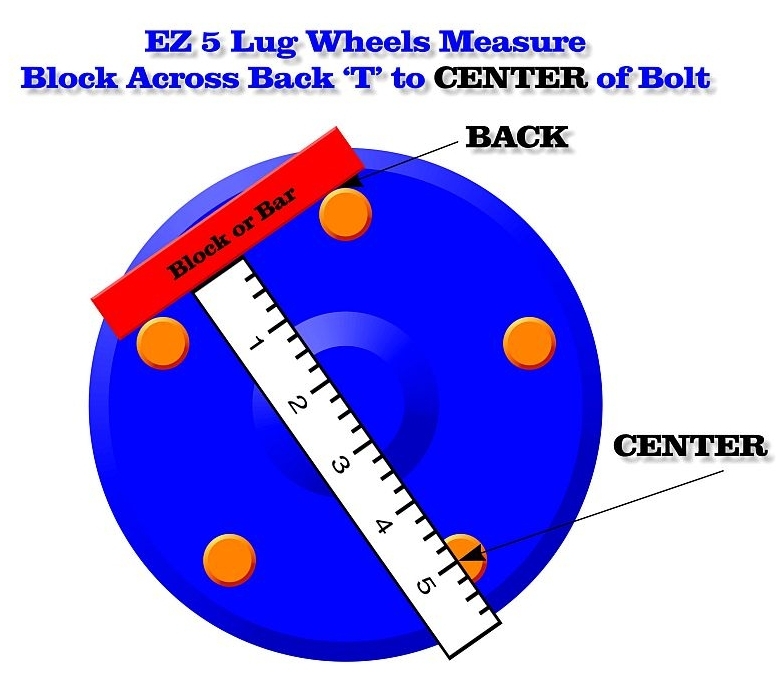
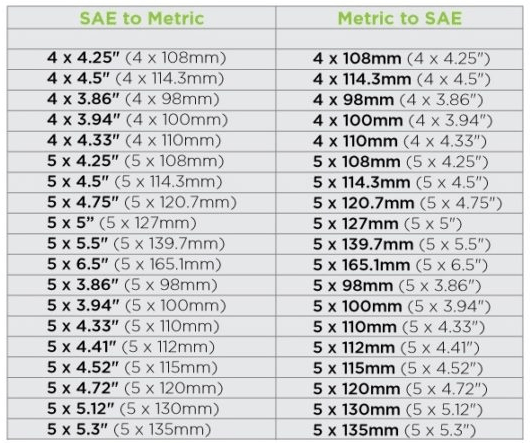
The 2004-2006 Pontiac GTO uses A 5x120mm bolt pattern. There are many wheel companies that make this bolt pattern. Only use wheels with the correct bolt pattern for your vehicle. Only use the 5x120mm bolt pattern on your 2004-2006 Pontiac GTO, unless a different or after-market wheel hub was installed which uses a different bolt pattern for the application.
| SPECIAL NOTE: The following is solely the opinions of the writer, and as the website owner I have an obligation to promote safety. I have seen many posts on forums of 5th Generation GTO owners using Imperial measurement bolt patterns on their GTO’s. Wheels such as Chevy Camaro, or Chevy Corvette have a 5×4.75″ (inches) bolt pattern. This bolt pattern is actually slightly larger than the GTO’s 5x120mm bolt pattern. What this means is the wheel will have a “sloppy” fit on the GTO. With that extra play in the wheel, you are risking the chance of breaking wheel studs. Below you will find a conversion table showing that the 5x120mm bolt pattern converted to SAE is actually 5×4.72″ (inches), which is a size not in production. The 5×4.75″ wheels may seem like they fit, but it is not a perfect fit. As a strong endorser of safety, I highly recommend using the correct bolt pattern for your cars. See the diagram below for SAE to Metric and Metric to SAE bolt pattern table: |
OFFSET (BACKSPACING)
Now for the extremely tricky part of this guide. Offset is the measurement used to determine where the wheel will sit when mounted. Offset is sometimes also referred to as “backspacing”. Wheel offset and backspacing measure the same thing, just in a slightly different way. What I mean by where the wheel will sit when mounted, is the location of the wheel under the wheel well. Different offsets can tuck the wheel further under the vehicle and wheel well, or make the wheel and tire stick further out past the body and wheel well. If the offset is wrong and the wheel sits too far in, you risk the wheel and tire rubbing on the suspension parts. Hence the problem with using too wide of wheels. The wheel will actually rub or rest against the suspension. If the offset puts the wheel too far out from under the wheel well, you risk rubbing the tire on the body when the suspension is compressed. Again, a problem with putting too wide a wheel on the vehicle, the body of the car will rub on the tire. This is also a problem for car owners who lower the vehicle. Car owners looking to put much wider wheels on their vehicles run into the problem of going too wide without the proper offset, and the tire ends up rubbing on either the suspension or the body of the car. Changing your suspension to adjustable coil-overs, or by adding “drag bags” could give your tires the clearance it needs, but that’s a completely different subject that I will cover in Part 2 of this guide. Watch the video below on how to determine offset and backspacing:
Below is a chart to convert offset to backspacing. On the 2004-2006 Pontiac GTO for example, you will see an 8″ (inch) wide wheel with a +48mm (millimeter) offset will be just under 6 1/2″ (inches) of backspacing:
So now that we know what offset and backspacing are, things should be starting to make sense.
TIRE SIZE
Finally, time for the fun stuff, tires! Tires come in all sorts of styles and sizes. Choosing a tire depends on what you want to use it for. Do you need an all-season tire that can be used in all kinds of weather conditions, or are you looking for a summer tire that really sticks to the road? Maybe you need a lower profile tire because you want to run oversized wheels. There are also the tires racing enthusiasts choose, drag radials, and slicks.
Whatever your needs are, I’m going to do my best to try to explain what you should be looking for. Very first thing you need to know is what size wheel do you have. The 5th Generation Pontiac GTO comes with either 17″ (inch) or 18″ (inch) wheels from the factory. Now we need to know how to read the different tire sizes.
On the side of any street tire, you will find a set of numbers like this: 245/45R17. You will notice the numbers are separated by a “/” and also by a letter such as “R”. The first number is the width of the tire. The first number (tire width) is measured in millimeters, sidewall to sidewall. The bigger the number, the wider the tire. The second number is the profile or sidewall height of the tire. This number is a percentage of the width of the tire. In the example below, the tire’s sidewall height is 75% of the width of the tire. The width of the tire in the example below is 185mm so the math formula for the sidewall height would be 185 x 0.75 = 138.75mm (or 5.46″ inches). Again, the bigger this number is, the taller the tire will be. The third number after the letter “R” is the wheel size in inches. See the diagram below:
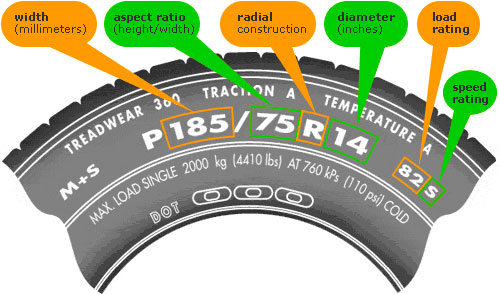
Wheels are only capable of holding a tire wide enough to safely create a seal between the tire and wheel bead so the tire can hold air safely as well as stay securely on the wheel. So if you are thinking of putting some super wide tires on that factory 8″ (inch) wide wheel, think again.
Next is the profile of the tire, the second number. Your car has only so much tire clearance to fit the wheels and tires inside the wheel well. Too tall a tire and you will have your tires rubbing against the wheel wells as well as the body of the vehicle, especially the front wheel when you turn, and the back wheels when you hit a bump in the road and the suspension compresses. Suspension travel and wheel travel must be taken into consideration to give your wheels enough breathing room.
WHAT DO THE LETTERS ON THE TIRE MEAN
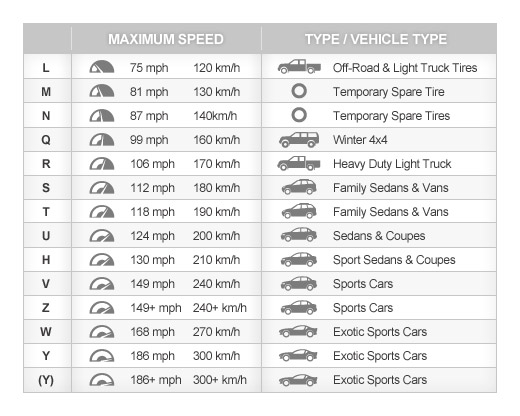
You may have noticed in my above example of tire size 245/45R17, there is a letter separating the second and third tire size measurements. The “R” stand for Radial Tire. The letter “R” is pretty much an industry standard now since all street tires are radial tires. The only time you may see something different is possibly if another letter comes before the “R”, such as 255/40ZR18. The letter “Z” is added to show the tire is a “Z” rated tire which means the tire is capable of speeds up to 149 miles per hour without tire failure. This is mostly done for show since all tires have a load and speed rating after the tire size. This brings us to our next lesson, the speed rating of tires.
The speed rating of tires is extremely important, especially if you plan on doing any kind of racing where you will exceed 100 miles per hour. The load index and speed rating of the tire can be found after the tire sizing. Using the diagram below locate the load index and speed rating:
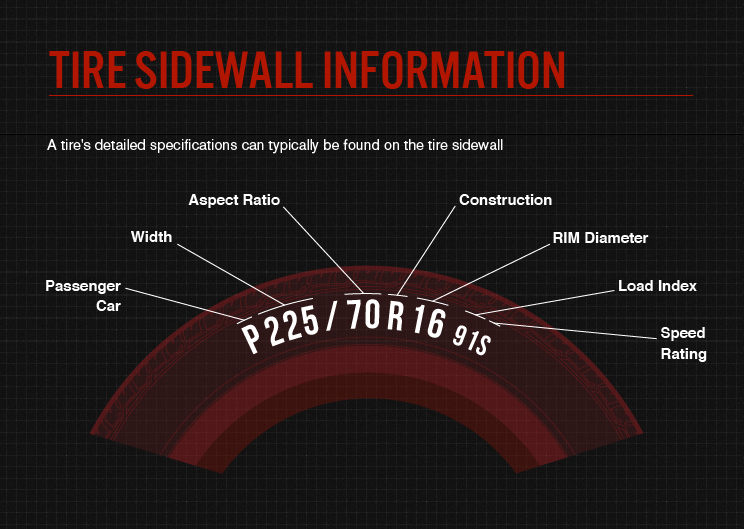
Load Index is an assigned number that corresponds to the maximum weight that a tire can support when properly inflated. The higher the tire’s load index number, the greater its load-carrying capacity. I do not recommend choosing a load index tire below the recommended factory tire. Keep in mind, load index includes having heavy items in the trunk, passengers, and a full tank of gas. Below you will find the load index rating chart::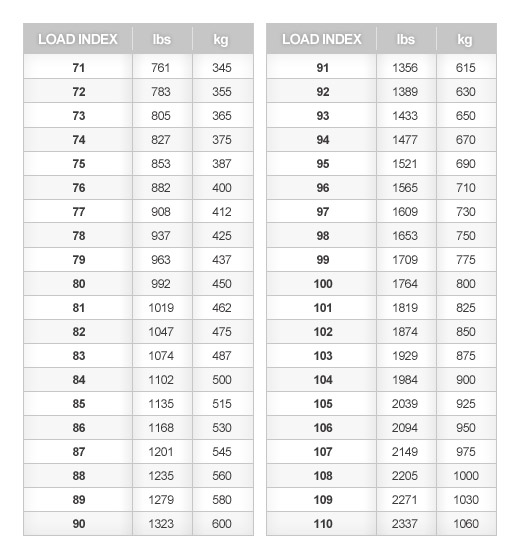
Speed Rating is a rating used to test the tire’s maximum speed without failure. In other words, it’s the fastest speed a tire can handle before it does not perform as designed. The speed rating tells you the maximum speed capability of the tire when properly inflated. The higher the speed rating, the better the grip and stopping power, but the lower the tread life. Most high-speed-rated tires are made for summer driving conditions only, not winter or snow. You can always increase the speed rating of the tires on your vehicle for improved performance, but can never decrease it without reducing the vehicle’s top speed to that of the lower speed rating selected. Below you will find the speed rating chart:
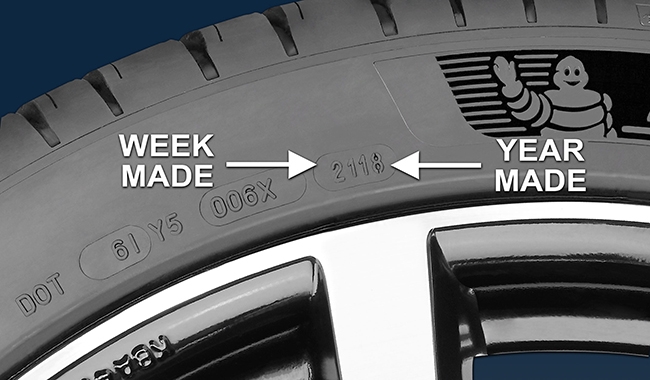
The age of the tire can be determined by reading the D.O.T. number on the side of the tire. The last four (4) numbers of the code will tell us what week/month the tires were made as well as the year. The first two (2) numbers are the week of the year the tires were made. The last two (2) numbers will tell us the year the tire was made. See the diagram below:
TIRE TREAD
The tread of a tire is the pattern molded into the tire to help disperse water and debris to gain traction to the road. While driving, water and debris are pushed to the canals of the tire tread and literally pushed out from under the tire, allowing the tire to safely make contact with the road giving the tire more traction. Hydroplaning can occur when your tires lose traction to the road and slides on a wet surface. When your car begins to hydroplane, the tires are no longer making contact with the road and your vehicle is literally driving on water, snow, ice, or whatever other wet surfaces your tires have made contact with. Tire tread can help prevent “hydroplaning” on wet surfaces.
You may notice tires have many different tread patterns carved into the tire. Yes, there are differences in the tire tread. Not all tires are designed for the same weather conditions. All season tires are designed as the name says, all weather conditions, but other tires may be designed strictly for rain, snow, or dry weather conditions. There are many different tread patterns available, and choosing a tire with the proper use is extremely important. Keep reading to see the descriptions and explanations of different tire tread patterns.
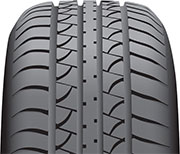 Symmetrical Tread – A “symmetrical tread” pattern is the most common. It uses continuous ribs or independent tread blocks across the entire tread face, which often create a wavy design. The pattern on each side of the center is the same. These tires can be rotated from front to back or side to side and can be installed onto the wheel with either side facing inside or outside. Symmetrical tread tires will give the least amount of road noise and have the longest tread life. This tread pattern is mostly used on all-season and snow tires.
 Asymmetrical Tread – “Asymmetrical tread” patterns combine the features of other tread designs for equally strong dry and wet performance. On an asymmetrical tread, you will find larger tread blocks on the outside to create a bigger contact patch for cornering grip. This also helps reduce tread squirm for better stability and breaks up heat build-up. The outside also features large lateral grooves designed to disperse water out the side of the tire. The inside features smaller, independent tread blocks and smaller grooves to increase contact area and improve grip. On an asymmetrical tread tire, the sidewall will have ‘inside’ and ‘outside’ markings so you know which way they need to be mounted. This tread pattern is used on all-weather tires and performance tires.
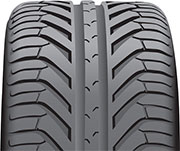 Directional Tread – Directional tires are designed with the tread pattern angled to point in one direction. The tread design is typically V-shaped and is more resistant to hydroplaning. The tread blocks are molded diagonally to push away water from the contact patch more effectively. Directional tires cannot be rotated from one side of the vehicle to the other side, they can only be rotated front to back – which can often lead to more road noise as they wear. On the sidewall, there is an arrow pointing out the tire rotation direction. These tires must be mounted going in this direction. You can not rotate these tires from side to side. You can rotate the tires from to back, only if the front and back tires are exactly the same sizes. If you are running two different tire sizes on the front and back wheels, the tires can not be rotated. This tread pattern is used on performance tires. Directional tires are by far my favorite and the tires I highly recommend for sports cars.
Tread Wear
Tires don’t last forever unfortunately and there is a way to check your tires for tread wear. As the tread on tires wears down, traction to the road will become less and less. No tread, no traction. No traction, you risk sliding and hydroplaning, or even worse, an accident. What you are checking for is tread depth in inches. The rule of thumb is this:
| Tire Tread Wear Test (in inches): | Results: |
| 4/32″ or deeper | Good |
| 3/32″ | Replace tires soon |
| 2/32″ or less | Replace tires immediately |
Use the penny test to check tread life on your tires:
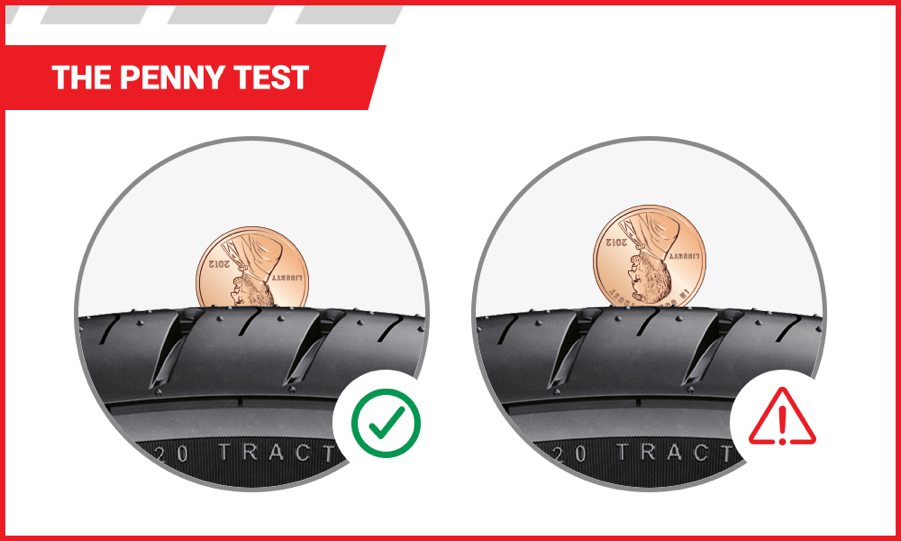 Insert a penny into your tire’s tread groove with Lincoln’s head upside down and facing you. If you can see all of Lincoln’s head, your tread depth is less than 2/32″ of an inch and it is time to replace your tires.
Yes, there’s a catch to how long your tires will last. Most higher-speed rated tires are made for summer use only, meaning warm and dry driving surfaces only. High-performance tires will grip the road better, corner better, and improve overall handling, but usually do not handle well in rain or snow. The higher the performance of the tire, the softer the compound of the tire, and they will wear out much faster. The softer the compound, the stickier the tire will be to warm dry surfaces. Drag radials and slicks for instance are very soft compound tires. They are designed for warm, dry conditions only. The drawback is, that these tires wear very quickly because of the soft sticky compound they are made of. On the other hand, an all-season radial tire is made of a much harder compound and will last much longer.
Choose a tire based on your driving conditions. All-season radial tires are the most popular and most sold tire on the market. All-season radial tires can be driven in both wet and dry conditions. Summer tires can only be used on dry surfaces. If you only drive your vehicle in summer or warm dry conditions, a high-performance tire may be a much better tire for you. Never drive a vehicle with summer tires in snow or icy conditions. Never drive with drag radials or slicks in the rain.
TIRE PRESSURE
One of the most overlooked aspects of tires is tire air pressure. Properly inflated tires will give you the best traction to the road, the best fuel economy, and overall make your vehicle safer to drive. Improperly inflated tires will also make your tires wear out faster. Over-inflated tires will create less tire in contact with the road which will create less traction as well as uneven tire wear. The center of the tire will be making contact while the outer portions of the tire (both inside and outside) will not be making contact with the road. Under-inflated tires will make much more of the tire contact with the pavement, but the negative result is more drag and lowers fuel economy. The tire will also lose its shape and form and wear the tire out much faster. Under-inflated tires will also cause a rougher ride and not handle and corner around turns as well as a properly inflated tire.
Tire pressure is measured by “psi”, pound per square inch. A tire pressure gauge is used to check the air pressure inside the tire. There are many different styles of tire pressure gauges on the market, and to be honest, they all do the same thing.
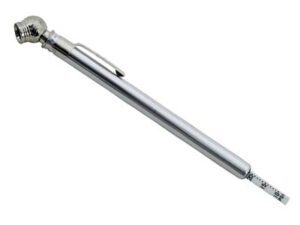
There are 3 (three) places you can look to find out what the proper air pressure for your tires should be. You can either look inside the driver’s side door of your vehicle for the tire information sticker, look in your vehicle’s owner’s manual, or look on the sidewall of the tire itself for the recommended tire pressure. Most wheel and tire shops will use the factory psi of the vehicle’s recommended tire pressure found on the tire information sticker inside the driver’s side front door of your vehicle. The sticker should either be in the door jam sill or on the door itself. See the image below:
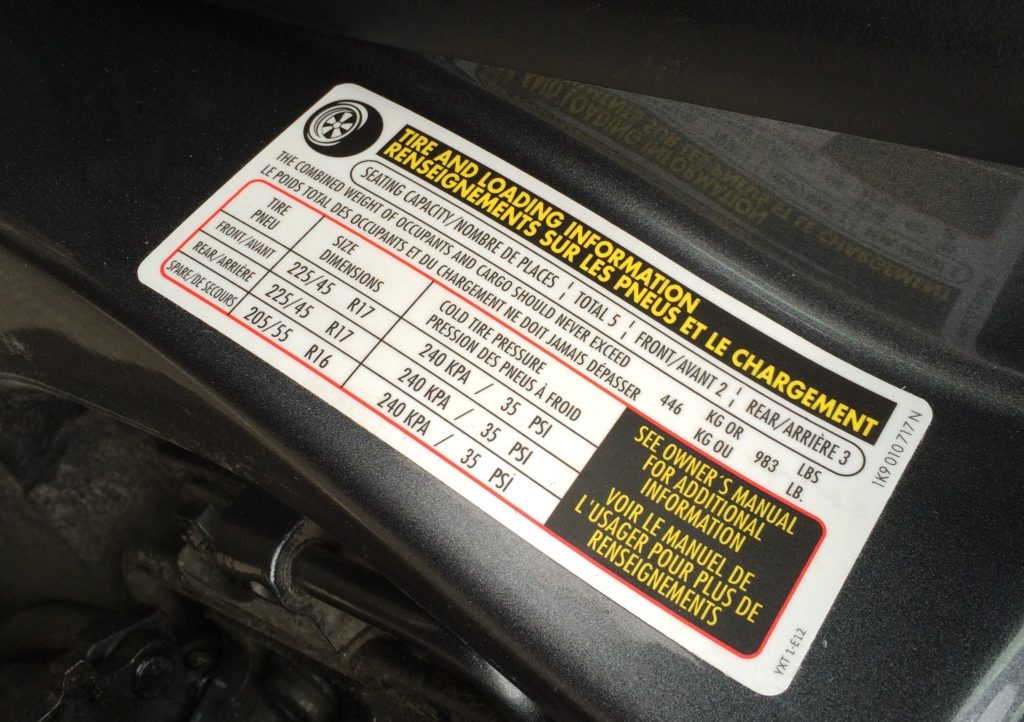
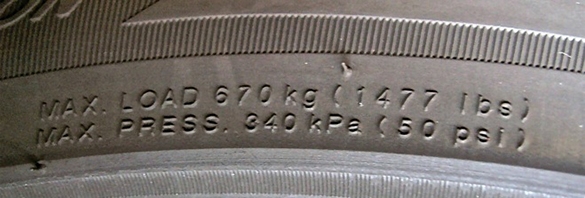
If for some reason this sticker is not on your vehicle, refer to your car’s owner’s manual for proper tire pressure. If you don’t have your vehicle’s owner manual, you can just look at the side of the tire itself for the tire pressure information. Most sidewalls of a tire will show the MAX psi for the tire. This means the maximum amount the tire will hold. You do not want to fill your tires up to that amount, go below the max psi. Proper psi on most passenger cars is anywhere between 30-35 psi. Some tires will require more, such as the image example above, but for the most part, 32 psi is a fairly safe amount for tires. Your tire sidewall should look something like this:
Just for the sake of being completely thorough with this guide, you insert tire air pressure through the tire valve stem. See the image below:
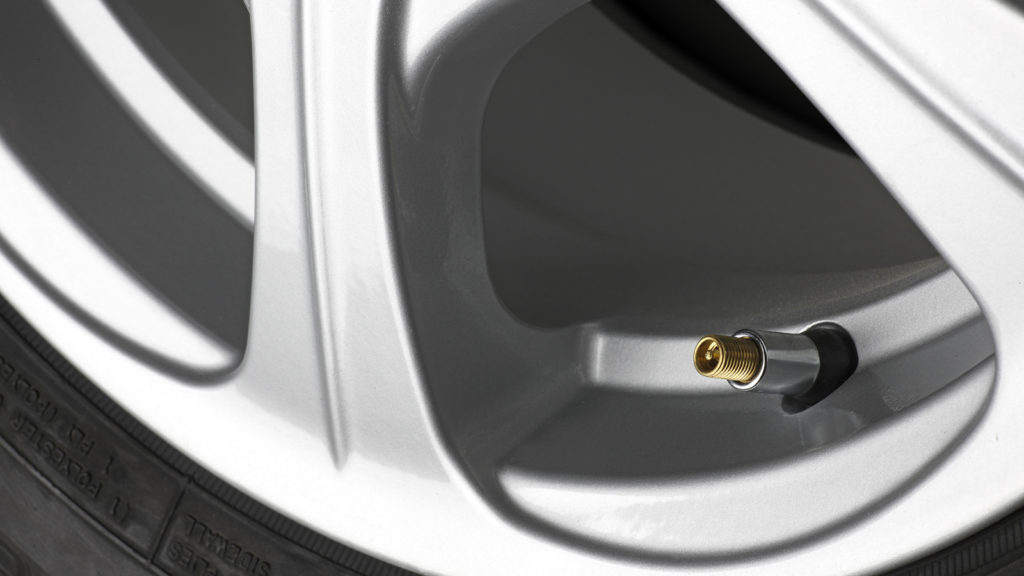
Some tire shops will offer to fill your tires with Nitrogen rather than air. Why would you do this you ask? Nitrogen is used in tires for racing. Nitrogen is less likely to migrate through tire rubber than is oxygen, which means that your tire pressures will remain more stable over the long term. Racers figured out pretty quickly that tires filled with nitrogen rather than air also exhibit less pressure change with temperature swings. That means more consistent inflation pressures during a race as the tires heat up. And when you’re tweaking a race car’s handling with half-psi changes, that’s important. Fortunately in the real world, Nitrogen is not needed. Regular air fills the tires up just fine, and if you are planning on going 200 miles per hour around corners on the streets, please stay out of my neighborhood. Just use air in those tires. All the nitrogen does is prevents any water from getting inside your tires. Compressed air does have moisture in it, a very small amount of moisture if it is a good air compressor. Not to mention air from air compressors is 78% nitrogen. If you feel there is too much moisture in your tires, press on the air valve, release the air until you feel no more moisture coming out, and fill it back up with air from a quality air compressor.
SUMMARY
So have I left anything out? With all the above information you should know everything there is to know about tires and wheels. How to identify your wheel size, how to read what size tires you have, and the importance of choosing the right wheel and tire combination for your car.
But is that all you may ask? The answer is NO, there is more. Each tire manufacturer may have a different circumference for their wheels, even though the tires may be the exact same size. This means some tires may sit slightly higher or lower under the wheel well, depending on the brand of tire you are using. The difference could be as small as 1/2″ (half of an inch) and as much as 1″ (inch) but for you car owners with lowered vehicles, that 1/2 of an inch can make a world of difference. This is why it is always recommended to use matching tires on the front and rear of the vehicle.
BUT WAIT, THERE’S MORE
I can already picture the scenario for all the 2005-2006 Pontiac GTO owners who are sick of riding on those skinny 235/40/18 tires on the back of your cars. You are thinking, “Hey, I’ll just put a set of 255/40/18 on the back wheels and nothing will change!” WRONG! With wider tires, you also gain a bigger overall tire circumference.
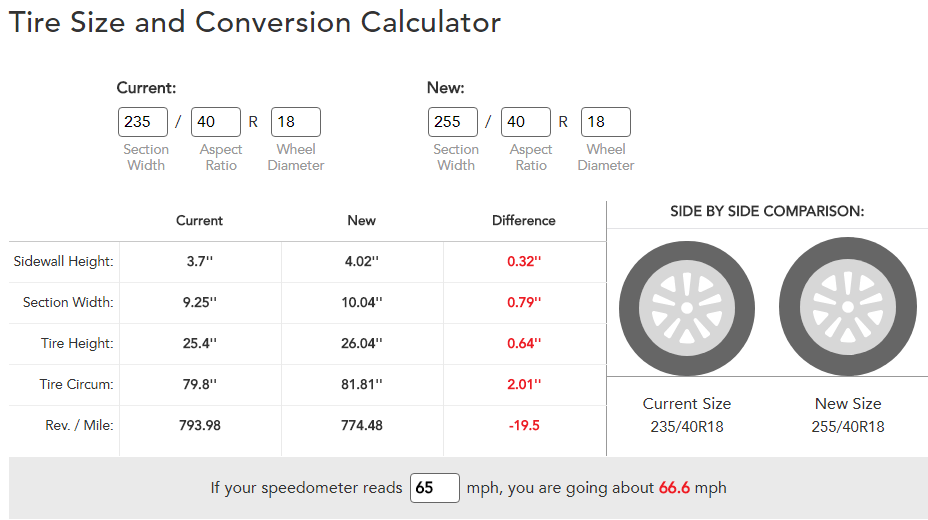
TAKE THE TEST – For this test, we are going to use the same aspect ratio (profile) and same size wheel, but change the width of the tire. Use these numbers on the Tire Size and Conversion Calculator website link below: Type in under “Current” 235/40/18. Type in under “New” 255/40/18. The link below will open in a new window. Keep both windows open to compare your notes to mine.
Click here to input the tire numbers: Discount Tire – Tire Size and Conversion Calculator
RESULTS – You will see the new wider tire, even though it has exactly the same aspect ratio (profile) and exactly the same wheel size is quite a bit larger than our original tire. Your results should look like below:
As you can see, the sidewall on the new tire is slightly taller, you are gaining more section width (amount of tire to the pavement), but the big difference is the tire height. Our new tire is over 1/2″ (half an inch) taller than our original tire. And also gains over 2″ (inches) of overall circumference. Also, your speedometer will change a bit, but only by 1.6 miles per hour.
Knowing this new information, your vehicle will sit slightly differently. More importantly, can your suspension handle the change with now less room between the tire and wheel well?
The simple solution of course is to drop down to 35 profile tire, 255/35/18, which will give you plenty of wheel clearance and still gain a wider section width to the pavement. For the purpose of this exercise, I just wanted to prove there is a change in the tire when using the same profile measurement when moving to a wider tire.
This test is especially important for lowered vehicles. Know how much room you have to prevent wheel rub. Use the tire size calculator above to determine how much space you will lose or gain when switching to different tires.
BUT WAIT, THERE’S EVEN MORE
So now that you have all this information, you are probably wondering if I offer a fitment guide for 2004-2006 Pontiac GTO’s. What wheels to buys, which tires to buy, what is the best size tire, what is the widest tire I can use, and I’m sure a few other questions. The answer is YES! I will be releasing Part 2 for this tires and wheels section because honestly, it’s just too much information to put on one page. Stay tuned…….
| Note: I hope you found the information contained on this website useful. Many hours of time and research have gone into building this website. Please feel free to donate to Mark Quitter Racing. Donations will be used to pay for website services or for any other practical use per your request which can be filled out on the PayPal donation link. There is no minimum amount, and your contribution is greatly appreciated. Donate here. |




Thanks for such a great info!
Submitted on 04/10/23 at 1:14 pm
Really appreciate your wheel guide for the 04-06 GTO, very concise & in depth guide to rims/tires.
My 06 GTO came with just awful aftermarket rims that are, well embarrassing!
I’ve owned her for 6 years & driven her one summer.impossible to find stock 18’s here in Canada, so will be looking for angood aftermarket rims to fit
Thanks so much for this invaluable info
Roger- Ontario, Canada