2004-2006 Pontiac GTO Drive Belts replacement. If it is time to replace the belts on your 5th generation GTO, you came to the right place. The owner’s manual recommends changing the belts every 150,000 miles. I personally think this is way too long. Dayco recommends inspecting your drive belts at 60,000 miles and replacing worn belts at 90,000 miles. Below is an excerpt taken right from the Dayco Belt Training write-up:
| “Over the past 25 years, serpentine belts have changed considerably. 25 years ago vehicles had multiple serpentine belts that only had up to 4 points of contact. Today, serpentine belts can have over 10 points of contact, creating very complicated drive systems. These complicated drives offer many more opportunities for issues such as pulley misalignment, resulting in unwanted noise. Today’s belts are also made to last longer than their predecessors of 25 years ago. Years ago, belts were made with a Neoprene rubber compound that lasted 50-80,000 miles before failure or replacement. Today’s serpentine belts are made with an EPDM (Ethylene Propylene Diene Monomer) compound and should be inspected for wear starting at 60,000 miles and worn components should be replaced at 90,000 miles.” |
Recommended Belts For 2004-2006 Pontiac GTO
| YEAR | DESCRIPTION | PART NUMBER |
| 2004-2006 Pontiac GTO | Dayco Serpentine Belt/Main Drive Belt | 5060785 |
| 2004-2006 Pontiac GTO | Dayco Air Conditioning Belt | 5040430 |
Follow the below steps to change your vehicles drive belt:
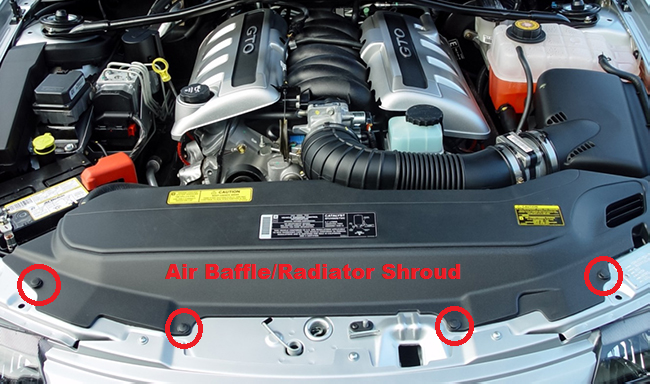
- Remove the plastic radiator shroud. Should be 4 push pin plastic body fasteners holding it in place, as well as a metal clip at the center of the shroud, underneath the plastic. Pull gently making sure to not break or crack the plastic shroud or the clip that holds it in place.
- Under the hood look for the serpentine belt tensioner, marked with a red arrow below:
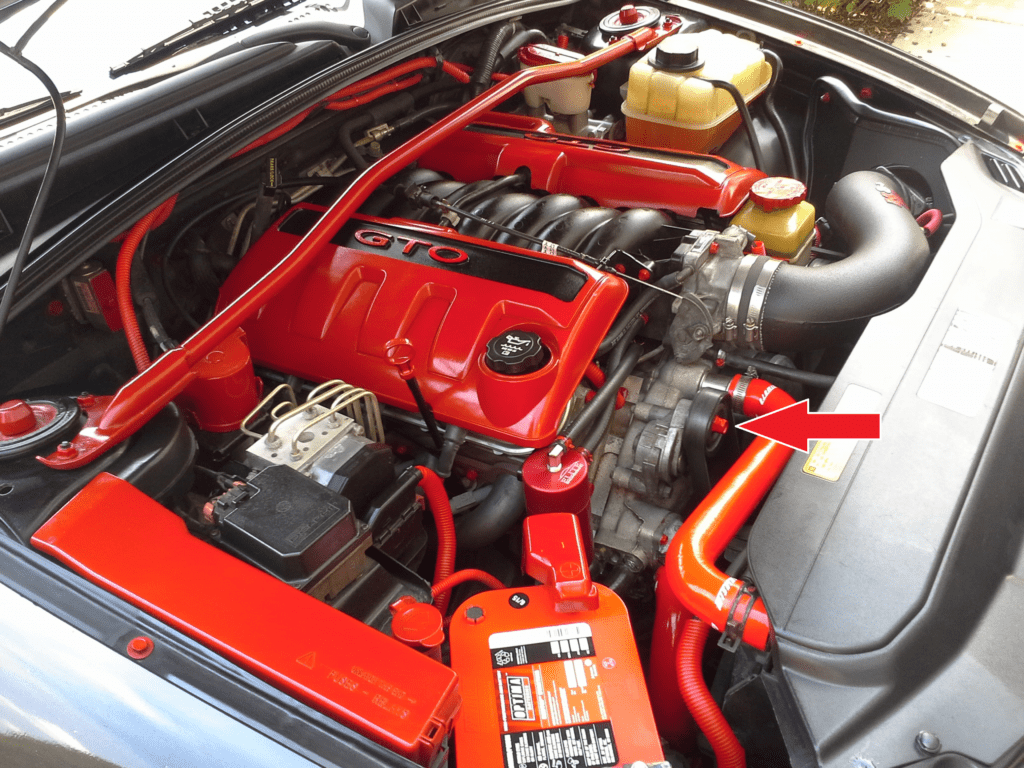 You will need a 15mm socket and a breaker bar or long handle ratchet. Place the socket on the bolt head and turn it to the right/clockwise to move the pulley tensioner. With the tensioner turned, this will release the pressure on the belt and you will be able to easily slide the belt off of the pulley. Release the tensioner, and completely remove the belt.
Note: If you are also replacing your air conditioning belt, remove and replace that belt before installing the new drive belt. The same concept applies. Use the 15mm socket on the a/c belt tensioner as shown in the diagram above, and turn clockwise. Release the belt. Install the new A/C Belt first, before installing the drive belt. The air conditioning belt sits behind the drive belt on the harmonic balancer, so it must be installed before installing the drive belt. - Begin installing the new drive belt using the diagram below. Route the belt in a way that the only pulley left for the belt to go on to is the belt tensioner you used to release the old belt.
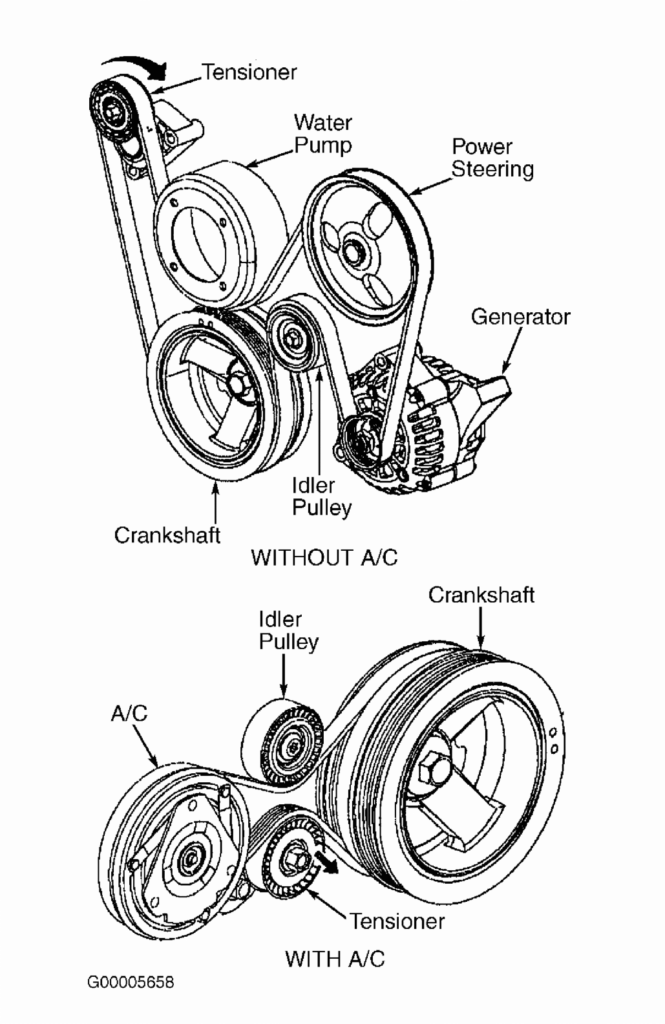
- Install the new belt. Using the 15mm socket, turn the belt tensioner clockwise and slide the new belt over the pulley. You will have to place the socket under the belt, so the belt can slide over the socket and onto the belt tensioner pulley. Release the tensioner and the new belt should be in place and tight.
- Reinstall the plastic radiator shroud. Line up the metal clip on the underside of the shroud and gently snap it into place. Install the 4 plastic push pins that hold the radiator shroud in place. Congratulations, you changed your belts!
| Note: I hope you found the information contained on this website useful. Many hours of time and research have gone into building this website. Please feel free to donate to Mark Quitter Racing. Donations will be used to pay for website services or for any other practical use per your request which can be filled out on the PayPal donation link. There is no minimum amount, and your contribution is greatly appreciated. Donate here. |
2004 GTO SERP BELT GM 92089561 GM 92067037 => GM 88932748 ACDELCO 6K785
2005 GTO EARLY VIN SERP BELT GM 92067152 => GM 88932746 ACDELCO 6K775
Used for vehicles built up to August 16, 2005 (Serial/VIN up to L491216). This part is now generally discontinued in many official GM inventories.
2005 /2006 GTO LATER VIN SERP BELT GM 92067037 => GM 88932748 ACDELCO 6K785
Used for vehicles built from August 17, 2005, onward (Serial/VIN from L491217). This is the standard belt for most 2006 GTO models.
AC COMPRESSOR BELT GM 92068285 => GM 88932543 ACDELCO 4K430
IDLER PULLEY GM 12557335 => GM 12557334 ACDLECO 15-4670 -> 15-4669