Over time the factory radiator hoses on your 2004-2006 Pontiac GTO may become brittle and weak. The intense heat of the engine coolant will cause the factory rubber hoses to expand and even crack over time. Factory or stock radiator hoses can also collapse or bulge. The soft rubber construction is not very durable and is not expected to last the life of the vehicle. Once a radiator hose does fail, it can very easily leave you stranded on the side of the road leading to costly repairs and towing charges.
-
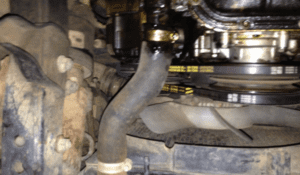
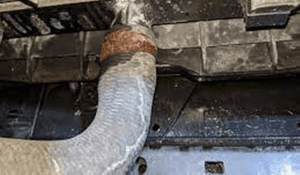
- Leaking At Hose Clamp
-
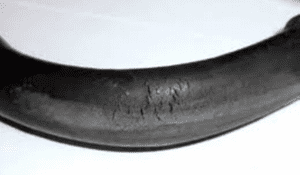
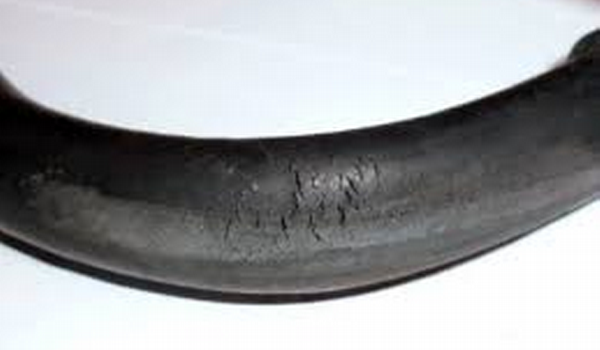
- Cracked Radiator Hose
-
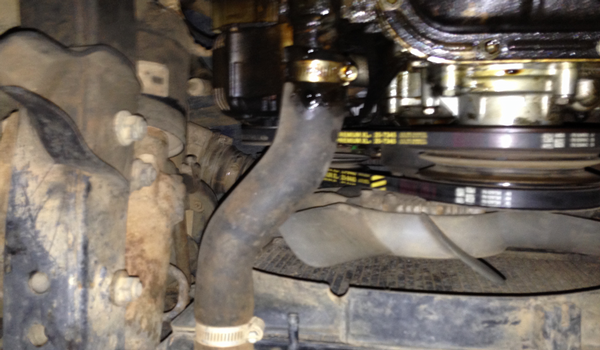
- Leaking At Hose Clamp
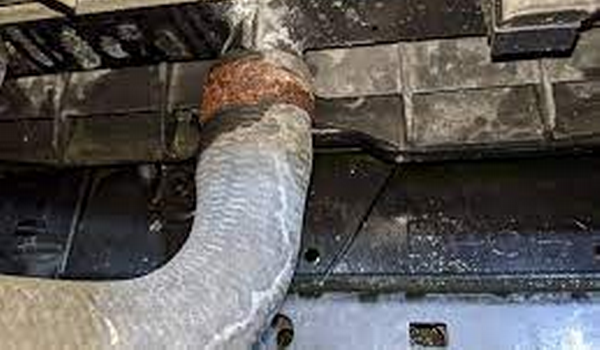
Inspect the radiator hoses where they attach to all inlets and outlets, this will be where the hose clamps are attached. Look for leaks and also inspect the hoses for cracks and deterioration. If you notice any of these tell-tale signs, it is time to replace the radiator hoses. Replacing the radiator hoses while replacing a thermostat, or draining the radiator coolant to add fresh coolant, or even while replacing the water pump is the ideal time to replace the radiator hoses. Fixing a problem before it becomes a problem is the best philosophy when it comes to automotive maintenance. It protects you and your vehicle from breakdowns and future repairs.
Which Radiator Hoses Should I use?
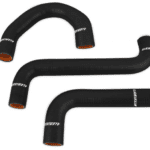
There are really only 2 choices for radiator hoses for the 2004-2006 Pontiac GTO. You can replace your hoses with the stock or factory hoses, or you can replace them with a more durable after-market silicone hose.
Most automotive parts stores will have radiator hoses factory replacements in stock. These will not be the exact factory replacements, but they will be the standard rubber radiator hoses made by various companies. These hoses may or may not have the bends and curves you need to replace your factory hoses. Most of these style hoses will be marked as “Universal”. Nothing fancy, and some may even be flexible.
The second, and a better choice would be a silicone performance radiator hose made by Mishimoto. These hoses come as kits and can not be purchased as individual hoses. They are designed for your vehicle as an exact factory replacement for the stock radiator hoses. They have an increased thresh hold for heat and can withstand temperatures up to 330º F degrees Fahrenheit. These hoses also do a much better job of reducing heat, which keeps your cooling system working efficiently and keeps your engine running cool and at the temperature, it was designed for. The added bonus of these radiator hoses, they come in colors. They can be purchased in black, blue, or red.
There are quite a few vendors out there who sell the Mishimoto Radiator Hose kits for the 2004-2006 Pontiac GTO. And of course, you can also purchase them directly through Mishimoto. When purchasing these kits, be sure to specify what year your vehicle is. The 2004 Pontiac GTO is a 3-piece kit, and the 2005-2006 Pontiac GTO will be a 2-piece kit. You can click on the following links of companies to view products and pricing: Kollar Racing, Summit Racing, Jegs, MaverickManCarbon, and Cold Case Radiators.
| Note: The 2004 Pontiac GTO is a different kit than the 2005-2006 Pontiac GTO. The 2004 GTO is a 3-piece hose kit, and the 2005-2006 GTO is a 2-piece hose kit. Please specify the year of your vehicle when ordering. |
-
- 2004 GTO 3 Piece Kit
| Note: Now would be a good time to replace the thermostat as well. Since you need to drain the radiator and cooling system to install the radiator hoses, you can easily replace the thermostat now as well. For more information, you can visit the “Thermostat” section of this website. |
INSTALLING THE RADIATOR HOSES
You will need to drain the radiator of all coolant to replace the hoses. You can view the THERMOSTAT section of this website to see a list of tools you will need to perform the task. This is a fairly easy project and can be done with basic hand tools. You do not need to remove the radiator. You will need 2 gallons of DexCool Antifreeze to refill the radiator when completed.
WHAT YOU WILL NEED:
| PART | DESCRIPTION |
|
Mishimoto Radiator Hose Kit Comes in your choice of Black, Blue, or Red. 2004 GTO will have a 3-piece kit. 2005-2006 GTO will have a 2-piece kit. |
|
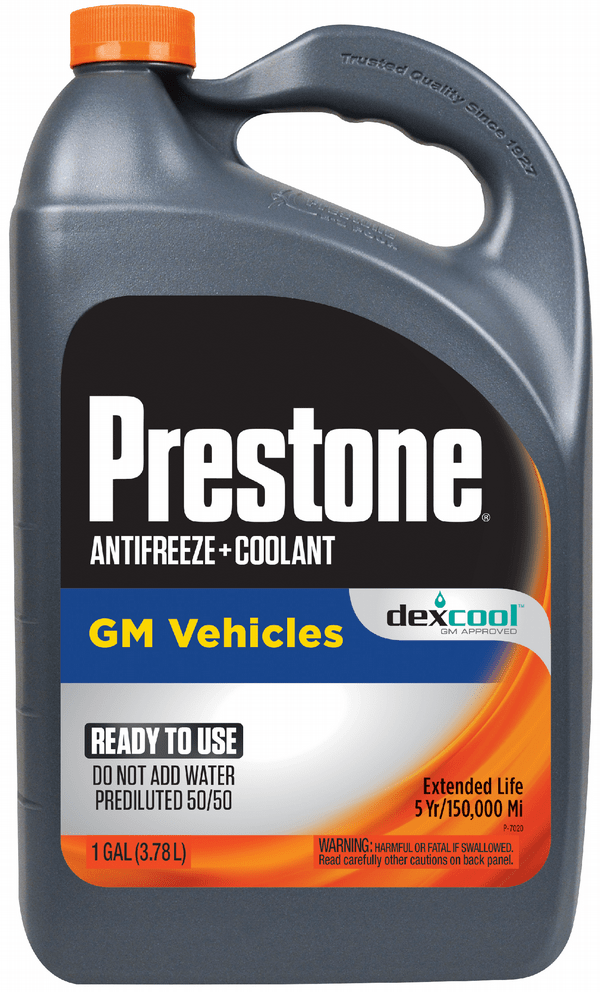 |
Antifreeze Coolant You will need 2 gallons of ready-to-use DexCool Coolant. This will be used to refill the radiator upon completion. |
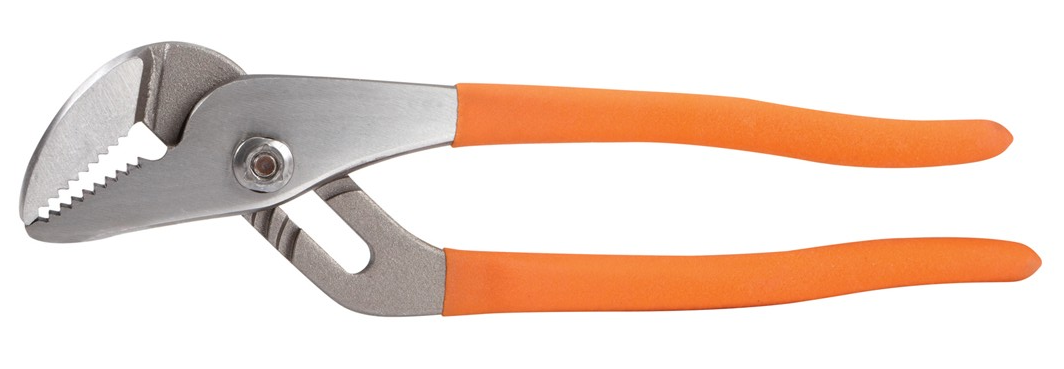 |
Adjustable Pliers These can be channel locks, adjustable joint pliers, or any adjustable pliers. Recommend a larger pair to release the spring clamps from the radiator hose. |
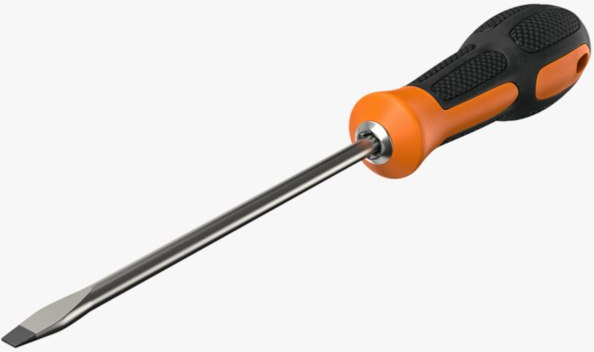 |
Flat Head Screwdriver If your radiator hose clamps are worm gear style hose clamps instead of spring style, you can use a flat head screwdriver to loosen the clamps. Your vehicle may have a combination of both. |
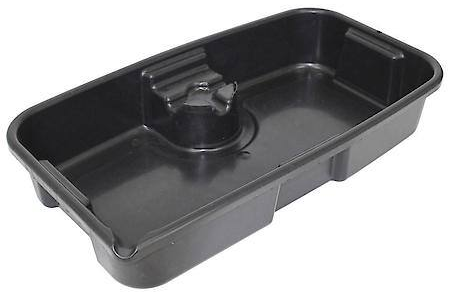 |
Fluid Catch Pan You will need a catch pan to hold 2 gallons of fluid. This will be used to drain the radiator of coolant. |
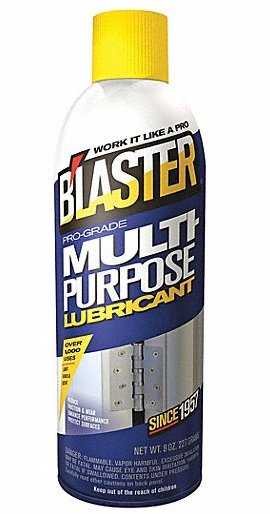 |
Blaster Multi-Purpose Lubricant Use multipurpose lubricant on the radiator and water pump necks to easily install the new radiator hoses. |
- Remove the radiator shroud/air baffle. Make sure the engine is cold. Do not work on a hot engine. Pop the hood open and start removing the air baffle/radiator shroud (plastic piece covering the radiator). You will need to remove this piece to access the radiator cap and to gain better access and more room to work when removing the hoses.
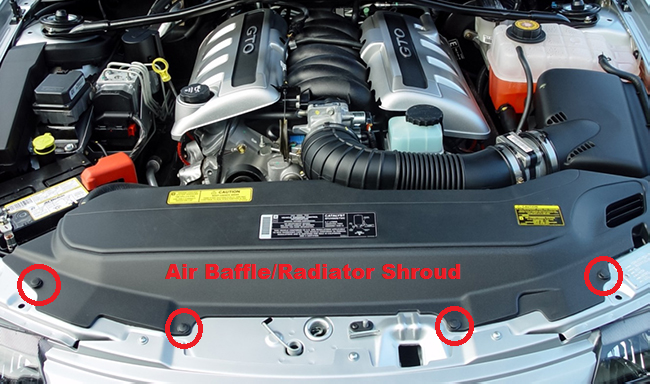 Use a small flathead screwdriver to remove the 5 push pin clips holding the air baffle in place. There is one more push clip on the far right side of the picture above (not shown). Just pull out the center part of the push clips to release the pins. Once the center of the clip is raised, you can pull out the push clips. Remove the radiator shroud carefully. There is a metal clip under the shroud holding it down. Pull the radiator shroud/Air Baffle up from the center to release the metal clip holding it down.
 - Drain the coolant from the radiator. Next, you will need to drain the radiator of all the coolant. On the 2004 Pontiac GTO, there is no drain plug on the radiator. So to drain the fluid you must remove the lower radiator hose located on the right side (facing the front of the engine). On 2005-2006 Pontiac GTO’s, a drain plug can be removed on the radiator to drain the fluid. You can find this on the right side (facing the engine) at the bottom of the radiator. Before draining the radiator be sure the engine is cool. You do not want to drain the hot coolant. You are going to need your fluid drain pan for this step. Approximately 1-2 gallons will be drained from the radiator. Place the drain pan underneath the draining area.
2004 Pontiac GTO – Use channel locks, adjustable pliers, or groove joint pliers to release the spring-type hose clamp from the outlet of the lower radiator hose. Slide the clamp away from the area it was holding as much as possible. If your hose clamp is not the factory spring clamp, you can simply use a flat head screwdriver to loosen the worm gear clamp and slide it away from the lower radiator outlet. Gently start pulling the radiator hose off the lower radiator outlet neck. You may need to use a flat head screwdriver to work the hose loose. Do this gently. The radiator is made of plastic and can break. Once the fluid is draining you can also loosen the radiator reservoir cap to allow faster draining. The factory 2004 Pontiac GTO does not have a radiator cap on the radiator. The coolant reservoir is used to fill the radiator. Once all the fluid is drained you can reinstall the radiator hose to the radiator.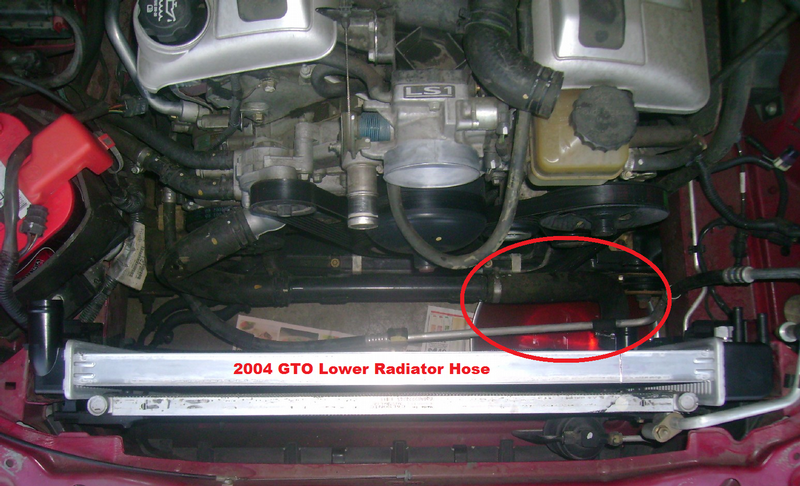
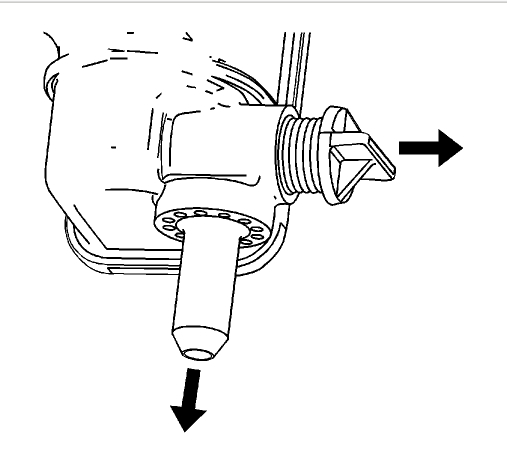
2005-2006 Pontiac GTO – Loosen the drain plug found on the lower right side (facing the engine) to drain the coolant. This is a wing-style plastic drain plug so use care when removing it. Gently use a set of pliers to loosen the drain plug, once it is loose, unscrew the plug by hand and completely remove it. Once the fluid is draining, go back to the top of your radiator and remove the radiator cap. The fluid should be draining much faster now. Once all the fluid is drained you can reinstall the drain plug. Tighten by hand, then use the pliers to turn the plug a quarter to a half tun more.
Note: Antifreeze coolant is poisonous to animals. As little as 2 tablespoons can be fatal to dogs and even less for cats. Please dispose of Antifreeze Coolant safely and away from animals and your pets. Clean up all spills and dispose of any rags or towels used to clean up Antifreeze Coolant. - Remove the radiator hoses. With the radiator drained of all coolant, you can now remove the radiator hoses. It does not matter which hose you start with, we will be replacing all of them. Do take special note of which radiator hose was where so you can match them up to the new radiator hoses for replacement. Use your adjustable pliers to squeeze the spring clamps open or use the flat head screwdriver to loosen the worm gear clamps holding on the radiator hoses to the necks of the radiator and water pump. Slide the clamps far enough away from the necks to give plenty of wiggle room to remove the hoses. Use the flat head screwdriver to gently pry away the hose if you need to. You should be able to remove the hoses using a twisting motion back and forth until they slide off the necks. Do this with all the radiator hoses. Remove all the hose clamps from the old hoses, you will be reusing them to install the new hoses.
- Install the new radiator hoses. Place the hose clamps on each radiator hose before installing. Place one hose clamp on each end of the new hose you are installing. Turn the hose clamps in a direction that you can easily get to them to tighten on the necks of the radiator and water pump. The Mishimoto Radiator Hoses fit very tightly. You will think they do not fit properly. But the silicone hoses stretch to ensure maximum tightness on the necks and prevent any coolant leaks from occurring.
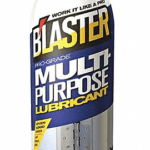
Spray a little Blaster Multi-Purpose Lubricant on the necks of where you are installing the hose, and spray a small amount inside the opening of the radiator hose. Do not spray a lot of lubricant inside the radiator hose, you do not want it dripping in the hose. Just coat the hose, and use your finger if you do not trust yourself. Spray the lubricant on your finger, and then wipe the inside of the radiator hose with your finger. Do not spray the lubricant into the radiator or water pump, just around the necks of the inlets and outlets of radiator hose fittings. Now slide the radiator hose onto the neck of the fitting and use a twisting motion back and forth until the hose is all the way on the neck of the fitting. Do not tighten the hose clamp yet. The Mishimoto Radiator hoses are silicone and already curved the way they need to fit on your vehicle. You may need to twist the hose a bit to get it where you want it. Install the other end of the radiator hose to the other neck, using the same instructions as earlier, a little multipurpose lubricant, and a twisting back and forth motion to install until all the way on the neck. Once the radiator hose is installed at both ends, you can twist the hose to exactly where you need it to be. Once you are satisfied with where the hose is sitting, you can work on putting the hose clamps in place. - Tighten the hose clamps. Use the adjustable pliers to place the spring-style hose clamp in place. Make sure the clamp is even and not crooked on the neck. Place the hose clamp as close to the end of the radiator hose as possible. Use the flat head screwdriver if you are tightening worm gear hose clamps. You do not need to over-tighten the worm gear clamps. The Mishimoto Radiator hoses fit very tight, to begin with. Tighten the hose clamps just enough to hold the hoses in place, and not too much as to damage the hoses by over-tightening.
- Fill the radiator with coolant. Once the hoses are securely back in place, you can begin filling the radiator with the new antifreeze coolant. Use the DexCool “Ready To Use” Antifreeze.

2004 Pontiac GTO – To fill the radiator you will actually be filling the coolant reservoir tank. Fill the coolant reservoir tank until the fluid is slightly above the “cold” fill level.2005-2006 Pontiac GTO – Fill the radiator using the radiator cap hole. Completely fill the radiator until it can not take any more fluid. Do this slowly. Pour some coolant in and then wait a few seconds in between pours. This will force any air bubbles in the radiator to rise to the top. As you get closer to being full, you will see bubbles rising. Fill the radiator completely and do not put the radiator cap back on until you see no more air bubbles in the fluid. - Start the vehicle and check for leaks. While the vehicle is running check for any drips and leaks. If you followed all the steps correctly, you should see no leaks. Let the car run for a few minutes to allow the coolant to run through the water pump. Shut the car off and check your coolant levels. Add more if needed. Start the car again and let run until the engine is warm. Check your temperature gauge and make sure the engine is not overheating Reinstall the radiator shroud/air baffle and you are done.
| Note: I hope you found the information contained on this website useful. Many hours of time and research have gone into building this website. Please feel free to donate to Mark Quitter Racing. Donations will be used to pay for website services or for any other practical use per your request which can be filled out on the PayPal donation link. There is no minimum amount, and your contribution is greatly appreciated. Donate here. |
Submitted on 07/24/22 at 8:46 am
Can the Dexcool be flushed and replaced with Global Coolant? I come across quite a few mechanics whom I trust that despise Dexcool.
Submitted on 07/26/22 at 1:30 am
I have heard this gossip as well. From my research, problems will be encountered only when mixing coolant types. I personally have only used Dex-Cool in my LS engines. The horror stories I have read about have included mixing the green and orange coolant without doing a complete flush. I don’t know enough about the “Global” coolant to answer the question with confidence. I do know if you are going to switch coolant types, be very sure ALL the old coolant is out. This includes the coolant trapped in the heater core. Mixing coolant types will do far more damage than using what the factory calls for ever will. Give the radiator a drain every couple of years and put in some fresh coolant and you should never see a problem.