 |
Exterior lighting for vehicles has come a long way over the years. The ability to see the road at night, as well as seeing other cars, and other cars being able to see you while night driving is and always has been extremely important. There is no guarantee that every street, road, and highway you are traveling on will have the proper street lighting to ensure a highly visible area for you to drive on. And let’s face it, as human beings, our eyes are not made to see in the dark, hence the term “Let there be light”.
Traditional bulbs in vehicles use a glass casing with a filament that light ups when electricity is applied. The output of the light from bulbs will often give a “yellow” look for headlights, and on tail lights, parking lamps, turn signals, and brake lights, the bulbs are relying on the color of the housing they are being plugged into. In other words, the bulb filament lights, and then that light must shine through a red tail light or brake light before being seen. The already “yellow” look of the bulb light must pass through another obstacle, dulling down the amount of light even more before it is visible. Doesn’t sound very safe, does it? Of course, we will all think, just like an interior light bulb in your house, we will just put a brighter bulb in and it will be brighter. This concept, of course, looks great on paper, but unfortunately, the auto parts makers leave us with usually just a couple of options for headlights, tail lights, and brake lights you usually get one option for a replacement bulb.
HID Headlights
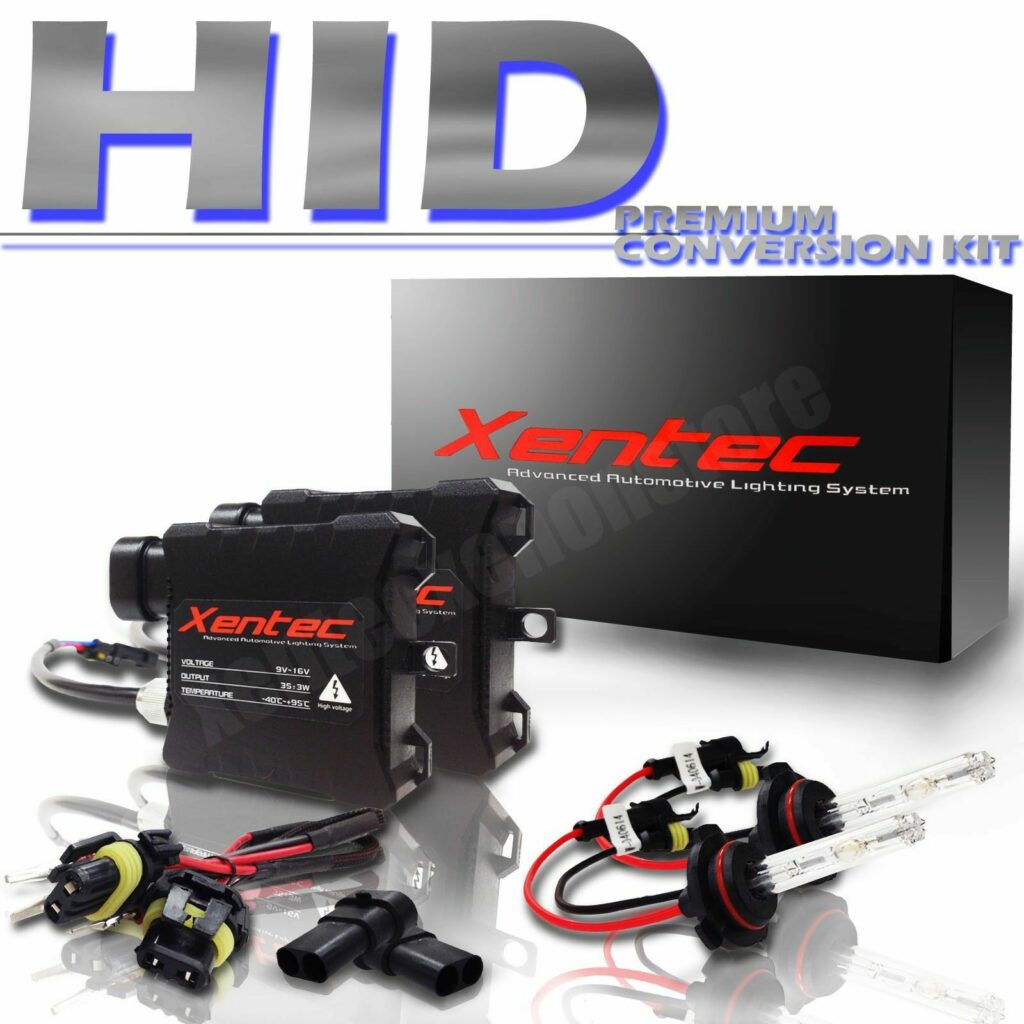
With forward movement in technology, HID (High-Intensity Discharge) lighting for headlights became available. With this technology, a broad range of different colors and color depths became available for you to install on your vehicle to light up the road better. The HID conversion kits need to be wired into the electrical system. Also, HID lights are not “instant on”, they need to warm up to achieve maximum brightness. These lights came in a variety of colors including Purple, Blue, Yellow, and other shades. I’m not really sure how having Purple or Yellow headlights is going to light up the road better or make your night driving experience any safer, but yet you have that option. Unfortunately, these were not “plug and play” kits, and some wiring is needed to install them. Below I found this kit on eBay for $29.99 for a 2006 Pontiac GTO. Please inspect the images and then continue reading.
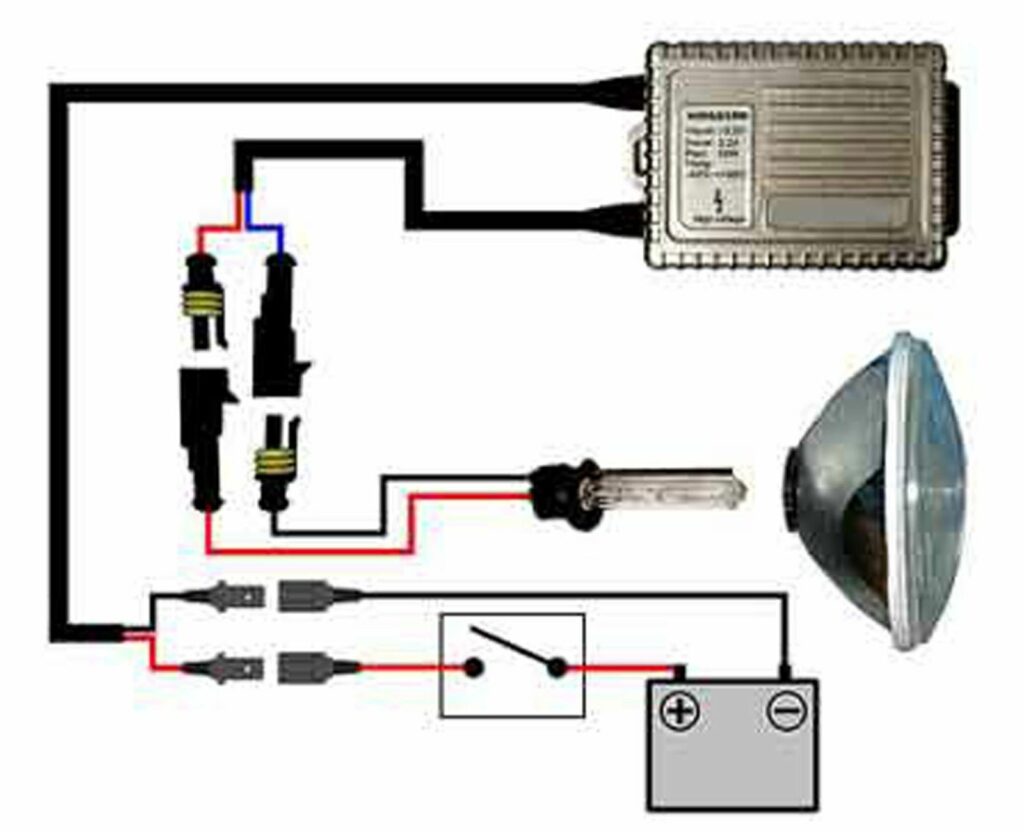
Doesn’t that look fun to install? Not really sure I trust a $29.99 product that needs this many wires just to light a headlight. Now check out the colors it comes in:

How will those colors improve my night driving vision and increase my safety? They won’t! You would be better off taping two flashlights to the hood of your car. In fact, two quality flashlights would cost more than this HID Headlight kit. This is a pure example of “You Get What You Pay For”.
…..And the Clouds Parted, and Plug and Play LED Automotive Lights Were Born
LED stands for Light Emitting Diode. LED lights use 85% less energy than a halogen bulb. LED lights also produce just as much, if not more light while using less energy. LED lights are also “instant on”. They do need to warm up to achieve the brightest output. Light in its purest form should be white. Not Purple, not Yellow, but a nice bright white illuminating what the light is directed at without producing glare or yellow look. I found the following light bulbs and LED light information on https://superbrightleds.com:
Light Bulbs
- Incandescent bulbs use—at most—10 percent of the energy they consume to make visible light; the other 90 percent is wasted heat.
- They produce a considerable amount of infrared (IR) and ultraviolet (UV) radiation that can be damaging to fabrics and artwork over time.
- They’re designed to last around 1,200 hours.
- Incandescent bulbs have a fragile glass envelope and brittle filament wire.
- These bulbs are relatively cheap but consume so much energy that standard 40- and 60-watt options are no longer available for purchase in the U.S.
- They create a warm yellow light.
LED Lighting
- LEDs run much cooler than incandescent and halogen bulbs, which greatly increases their longevity and enables them to function in cold temperatures.
- Unless an LED is specifically infrared (IR) or ultraviolet (UV), it produces little to no IR or UV radiation, which can be damaging to fabrics and artwork.
- They can last up to 50,000 hours—42 times longer than incandescent bulbs and 13 times longer than halogen bulbs.
- Power consumption is the lowest compared to all other lighting technologies—80 percent less than incandescent bulbs and 75 percent less than halogen bulbs.
- The shatterproof bulbs are shock-resistant and have no brittle filaments.
- LEDs require a higher initial investment but produce greater energy returns over time.
- LEDs contain no mercury, harmful gasses, or toxins.
- They are available in many different whites and colors.
- Because of their low power consumption, LEDs are great alternative lighting solutions for solar-powered systems.
Just in the last 5 years, automotive LED lighting has come a long way. The need for conversion kits has disappeared, and the introduction of true plug-and-play LED lighting replacement has arrived. What this means is simply to replace the bulb with an LED light. No wiring is needed. Applications are available now for almost any vehicle, and it literally is as easy as changing a light bulb.
After many hours of research, I have found the best lighting application for your 2004-2006 Pontiac GTO. Diode Dynamics has done all the research for us. Changing all of your exterior lights to LED lighting is the smartest and safest improvement you can do to make driving a night more pleasurable, as well as feeling safe that you can see the road better, and other cars can see you. Please watch the video below to get the full details on how LED lighting works for both vision and safety:
As you can see, Diode Dynamics offer true LED plug-and-play replacement lighting for your vehicle. No cutting, no wiring, simply remove your current light bulb and replace it with the new LED light. The new LED light will plug into your factory plug socket, and the light will fit in the housing just like any factory bulb.
2004-2006 Pontiac GTO Exterior Lights Parts List:
| PART | LUMENS | COLOR TEMPERATURE | PART NUMBER |
Headlights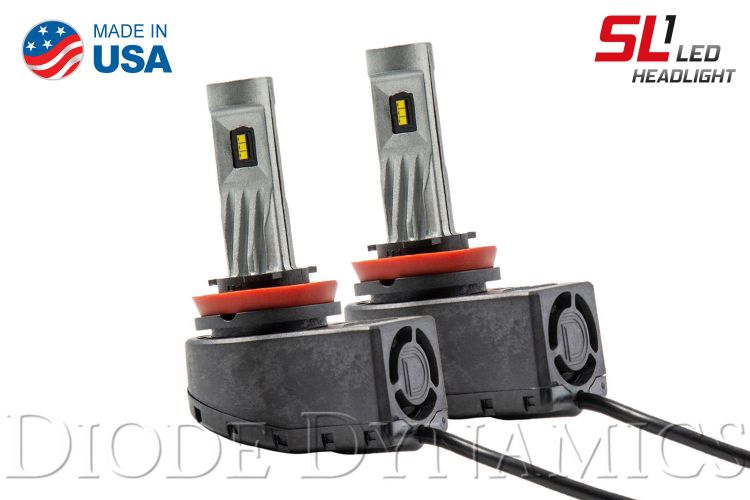 |
1630 per bulb | 6000K – Cool White |
H11 SL1 LED Bulbs (pair) |
| Fog Lights |
1630 per bulb | 6000K – Cool White |
H10 SL1 LED Bulbs (pair) |
| High Beam Headlights |
1630 per bulb | 60000K – Cool White |
H9 SL1 LED Bulbs (pair) |
Front Turn Signals – Switchback (Stay white when park lights or headlights are on until turn signal is activated)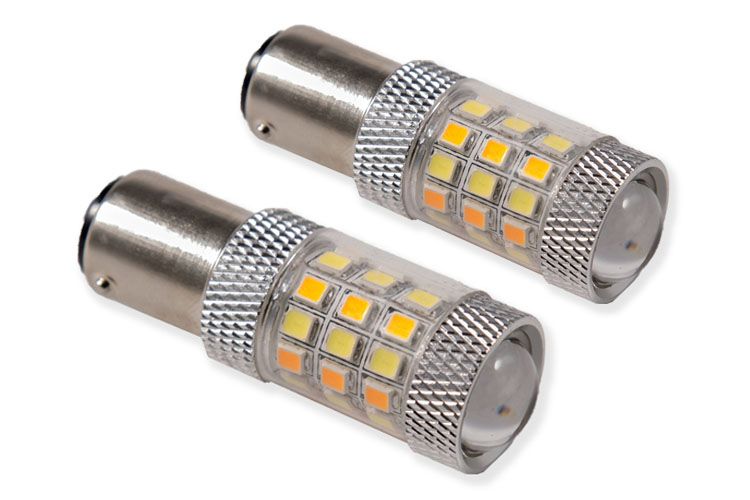 |
410 per bulb | Bright White/Amber |
Switchback Turn Signal LEDs for 2004-2006 Pontiac GTO (pair) |
Front Turn Signals – Regular |
510 per bulb | Amber |
Front Turn Signal LEDs for 2004-2006 Pontiac GTO (pair) |
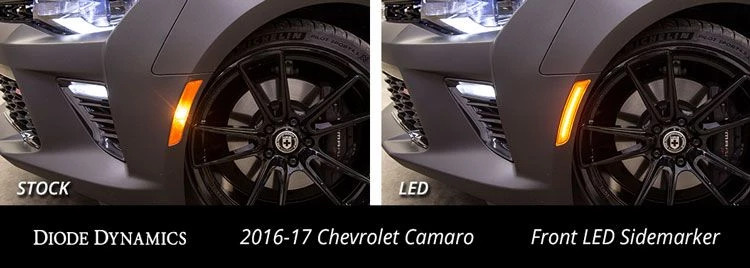
Sidemarker Lights – Front Bumper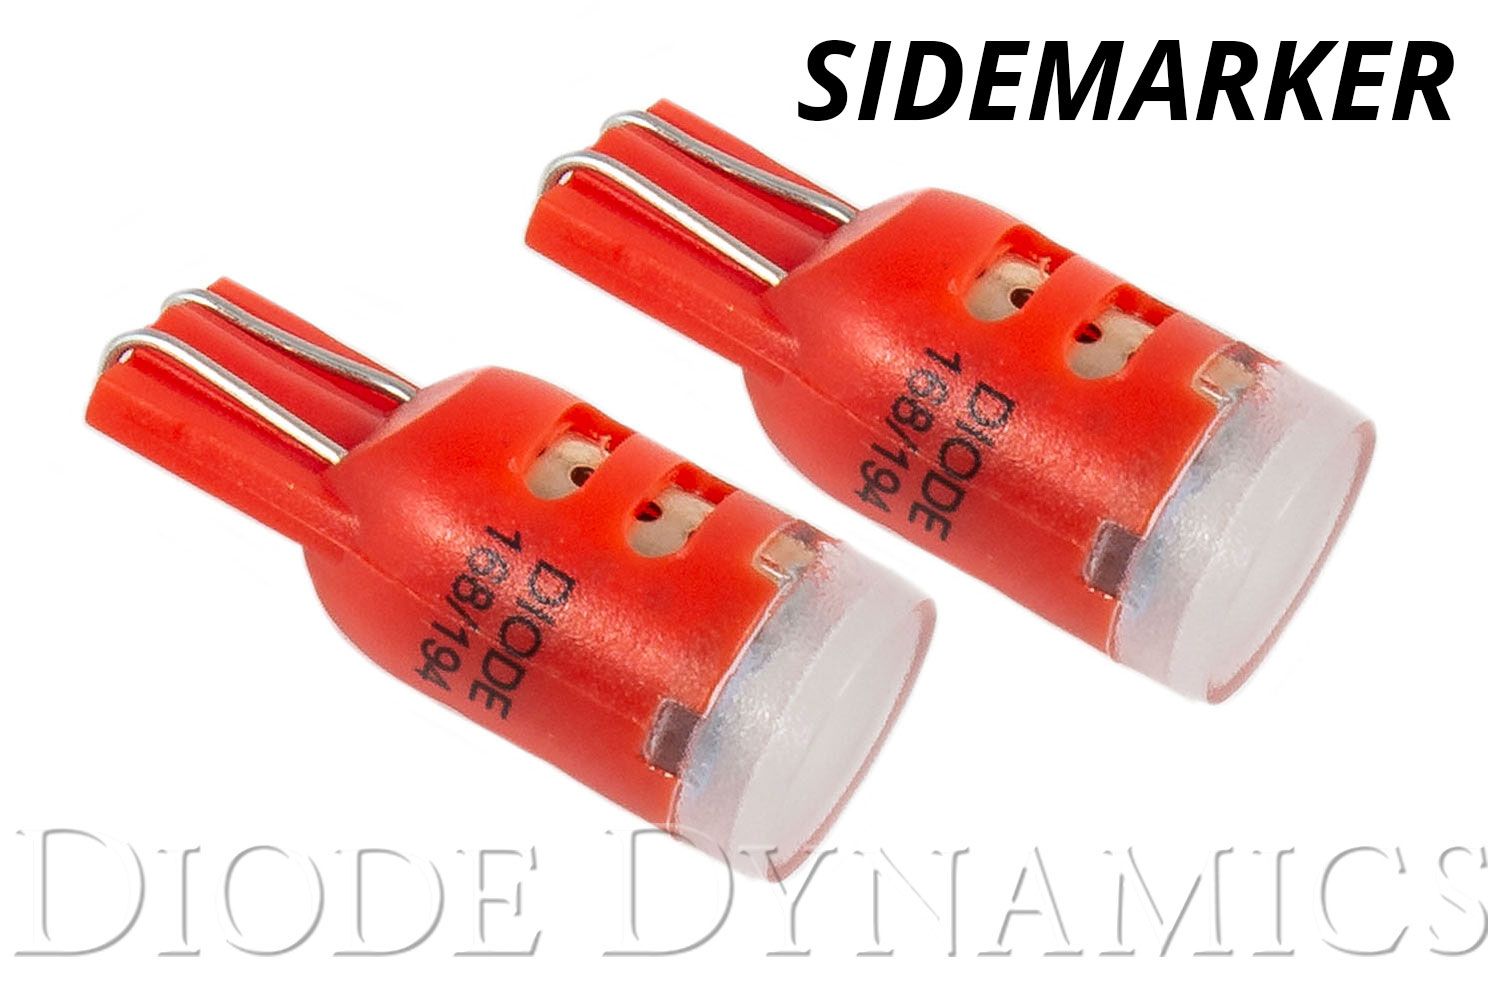 |
Unknown | Amber |
Sidemarker LEDs for 2004-2006 Pontiac GTO (pair) |
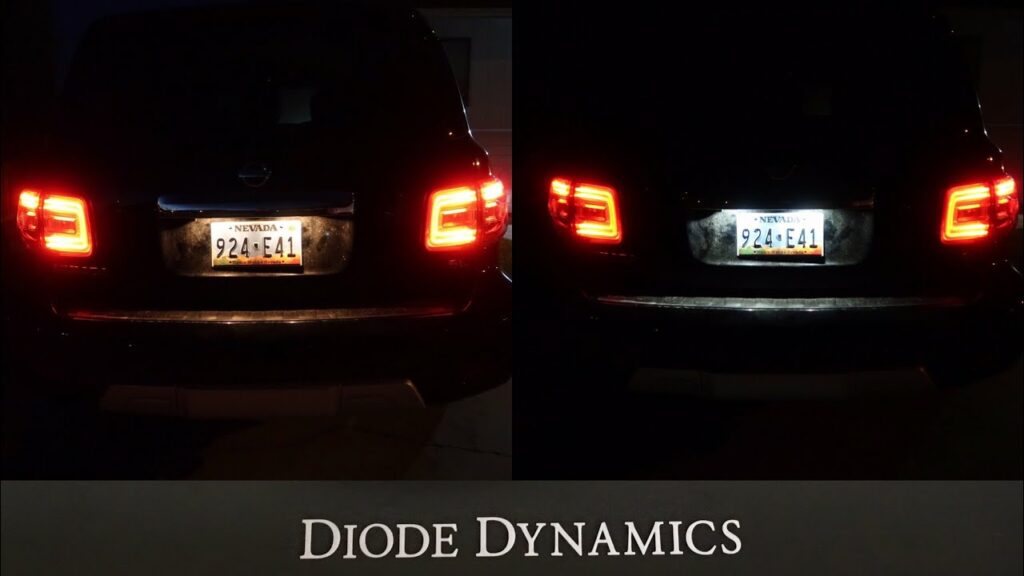
Tail Lights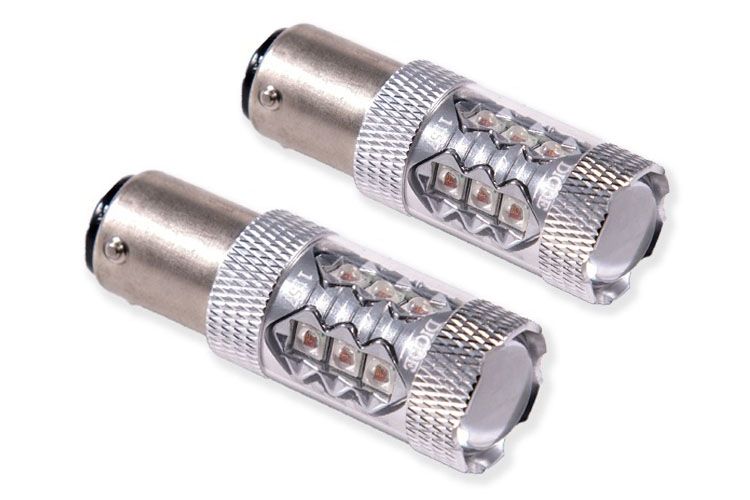 |
510 per bulb | Red |
Tail Light LEDs for 2004-2006 Pontiac GTO (pair) |
Back Up/Reverse Lights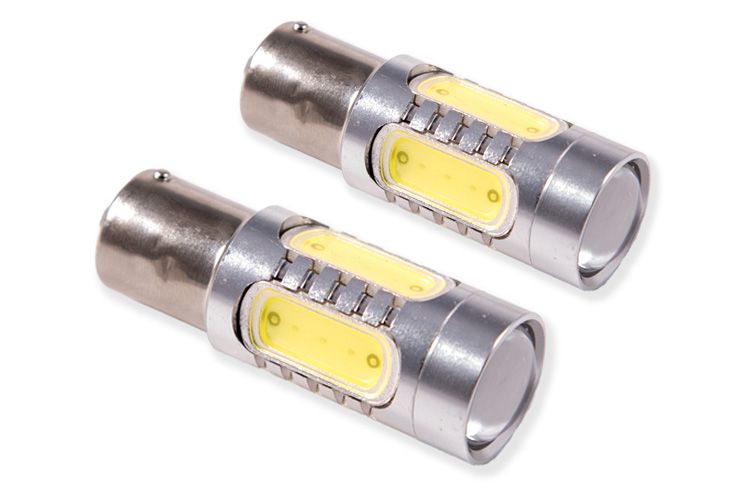 |
830 per bulb | 6000K – Cool White |
Backup LEDs for 2004-2006 Pontiac GTO (pair) |
Rear Turn Signals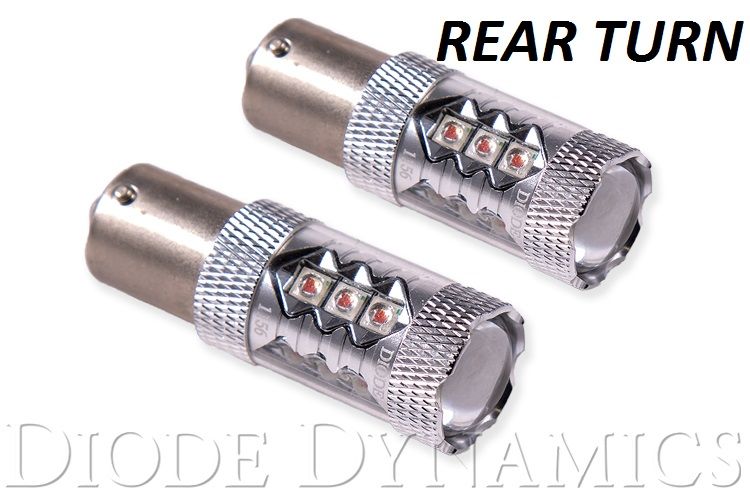 |
510 per bulb | Amber |
Rear Turn Signal LEDs for 2004-2006 Pontiac GTO (pair) |
License Plate Lights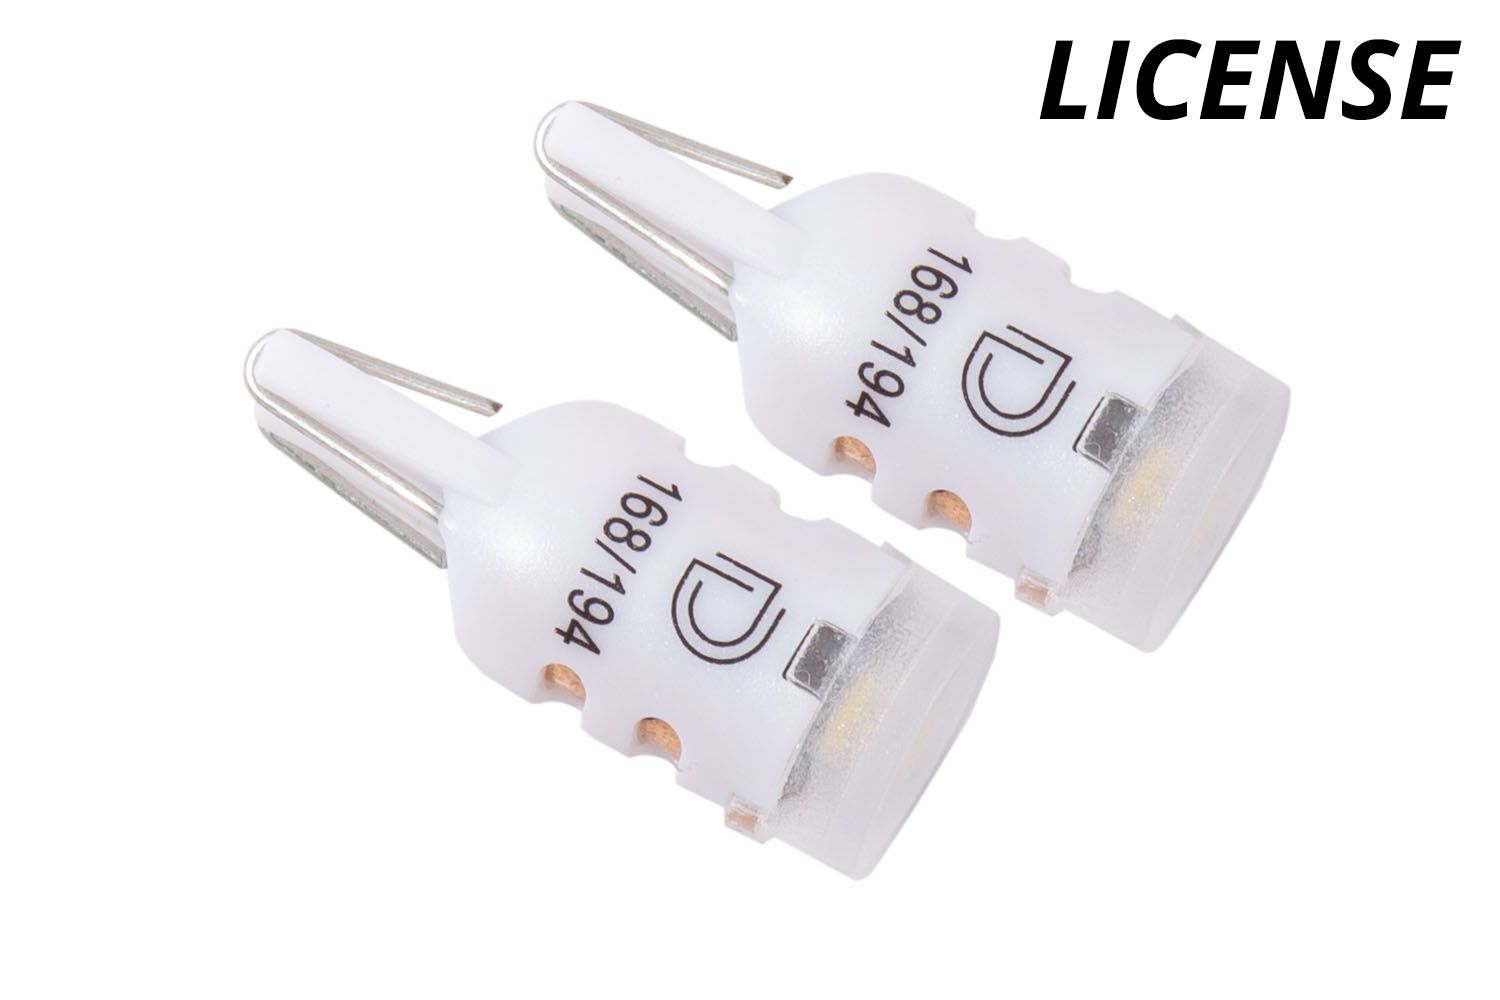 |
92 per bulb | Cool White or Pure White |
License Plate LEDs for 2004-2006 Pontiac GTO (pair) |
Relay Needed To Prevent Hyper Blinking With LED Turn Signal Lights
| PART | DESCRIPTION | PART NUMBER |
LED Flasher Relay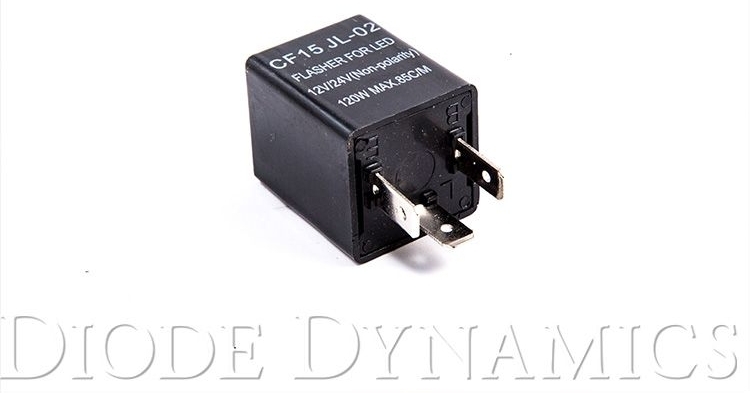 |
Replaces factory flasher relay to prevent turn signals from hyper-blinking. Installs in the fuse box under the driver’s side dashboard. Instructions below in turn signal installation. |
LED Flasher for 2004-2006 Pontiac GTO |
The LED Difference – Headlight/Fog Light Installation
- Step 1: Visit Diode Dynamics and purchase the following:
Low Beam Headlights
High Beam Headlights
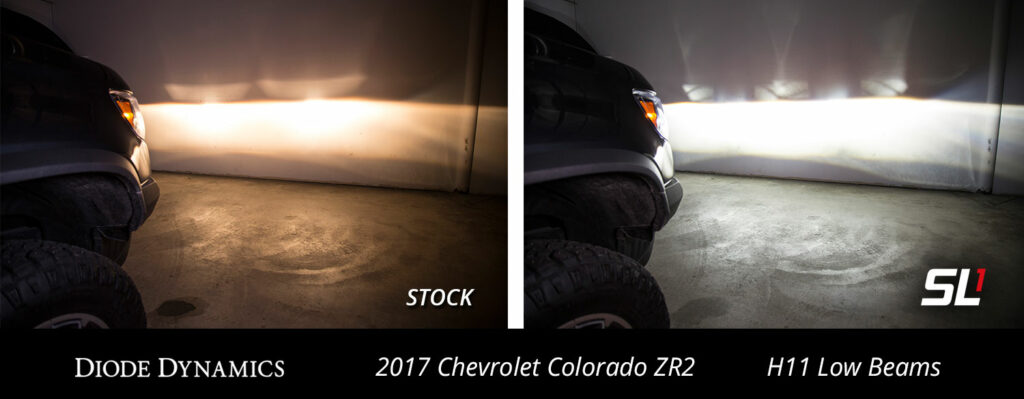
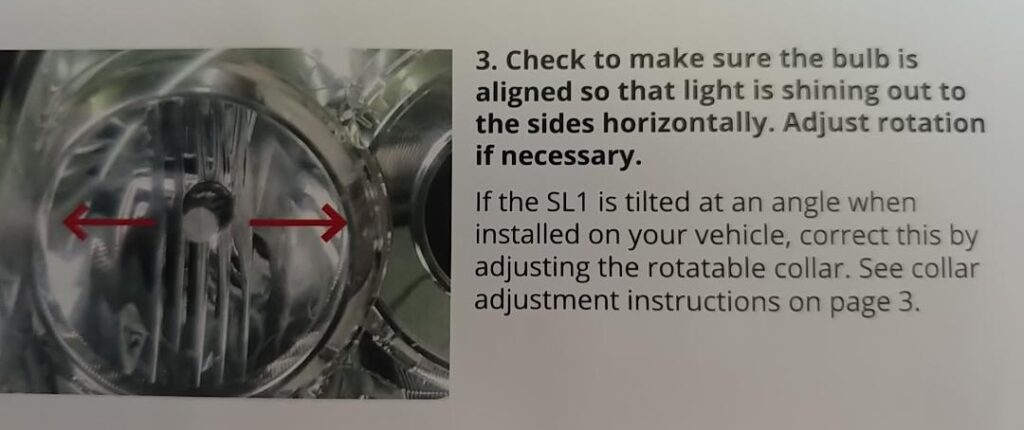
Fog LightsDOWNLOAD (.pdf format): Diode Dynamics LED Headlamps Installation Guide Optional: I personally did not replace the high beam headlights with LED lights. The low beam in conjunction with the fog lights and factory High beam lights light up the road plenty. But if you really want to put some light on the road, high beam LED’s are available. - Step 2: Headlight installation is fairly straightforward. On the driver’s side, if you have the factory (stock) airbox and air filter, you will need to remove the airbox to get behind the headlight assembly to remove the bulb. If you have a K&N Cold Air Intake on your vehicle, you should be able to reach the headlight bulb without removing anything. Remove the dust cover cap that covers the headlight bulb. Turn the Headlight bulb counterclockwise to unlock the locking tabs and pull straight out. Disconnect the low beam wiring plug from the low beam headlight bulb. Install the new LED light into the headlamp assembly. Be sure to line up the locking tabs and use slight pressure to push forward and turn clockwise to lock into place. Be sure the LED light is inserted per the instructions to get the maximum lighting effect. After the new led headlight is installed, you can re-install the headlight dust cover. The nice thing about the plug-and-play LED lights is they do fit just like the factory bulbs and the headlight dust covers can be installed. Repeat all the steps for both the low beam and high beam headlights.
On the passenger’s side, you will need to remove the battery to access the headlight assembly bulbs. Repeat the above steps.
Fog Lights
- Step 1: The fog lights may take a bit more time to install. I actually had to modify the locking tabs on the new LED light to get it to properly seat and lock into place. You may not have to do this. Nothing has to be removed to change the fog light bulbs. Simply reach under the front bumper and turn the bulb counterclockwise to release the bulb from the fog light assembly. Disconnect the light from the wiring plug. Before connecting the plug to the new LED light, check the fit. If the new SL1 H10 LED light fits and locks into place, connect the wiring plug, zip tie any extra wiring in place, and you are done. If you find you can not get the new LED light to lock in place, follow these steps.
DOWNLOAD (.pdf format): Diode Dynamics LED Bulb Installation 1) Compare the new SL1 H10 locking collar to the factory/stock locking collar. You will see the tabs don’t quite line up. Also, the overall thickness of the SL1 LED lock collar is slightly thicker than the factory/stock locking collar bulb.
Note: For the following steps you can use either a bench grinder or Dremel Tool to do a bit of modifying on the lock collar. This will not void your warranty on your product. 2) Remove the lock collar from the SL1 H10 LED light. Sand down the front of the lock collar making the collar itself a little bit thinner. The front of the collar will have lettering on it. Sand until all the lettering is gone. Do not sand down the backside. If you sand down the backside the lock collar will drop down farther making the light very hard to lock in place.
3) Sand down the 2 larger locking tabs themselves making the width of the locking tabs a bit smaller. There are 3 locking tabs total, 1 smaller, and 2 larger tabs. The smaller tab lines up just fine. The 2 larger tabs are a bit wider than the factory/stock locking collar. This will give more wiggle room to lock in the collar into the fog light housing. Sand down only one side of the tabs. Compare them to the factory bulb. Sand just a little at a time. You do not need to take much off. Just sand enough that all the locking tabs fit nicely into the fog light housing. Check the fit, lock your new LED light into place, use zip ties to neatly tuck away the wires, and you’re done.
The LED Difference – Tail Lights/ Reverse Lights Installation

- Step 1: Visit Diode Dynamics and purchase the following:
Backup Lights
Tail Lights - Step 2: Open your trunk. On the tail light housing, you will see two (2) Phillips head screws. Remove the screws. Gently pull from where you removed the screws, but do not pull hard or remove the tail light assembly yet. Once the tail light is loose, push the tail light forward and slightly diagonally to remove it from the clip that is holding it into place. You may want to use masking tape on the paint around the housing to prevent scratching your vehicle. You do not need to push hard. Once the tail light is free, place a towel under the assembly and just let the tail light hang (it doesn’t weigh much), or just go ahead and disconnect all the lights by twisting counterclockwise on the socket from the tail light assembly.

- Step 3: Replace the backup light and tail light with the new LED light bulbs. Be sure the bulbs lock into place in the sockets. Plug the socket back into the tail light housing by lining up the locking tabs and turning clockwise to lock it into place.
- Step 4: Re-assemble the tail light housing. Lock in the tab on the front of the tail light first, then gently push the tail light into place, being sure the mounting screw holes line up. Before installing the 2 Phillip screws, make sure the lip of the trunk weatherstrip is slightly over the tail light housing. Insert the screws and hand tighten. Repeat all the steps for the opposite side tail light.
The LED Difference – Front Side Markers Lights Installation
- Step 1: Visit Diode Dynamics and purchase the following:
Sidemarker Lights
- Step 2: This is an extremely easy install. Simply reach under the front bumper to reach the side marker light. Turn the light socket counterclockwise to remove the socket and bulb from the side marker assembly. Pull out the factory bulb, literally (these bulbs do not twist in, just pull straight out). Plug the new LED light into the bulb socket. Reinstall the socket into the side marker assembly by lining up the tabs and turning clockwise to lock it into place. Piece of cake!
The LED Difference – License Plate Lights Installation
This installation project will take you longer to open the package of new lights than it does to actually install the lights. By far this is the easiest LED installation on the 2004-2006 Pontiac GTO.
- Step 1: Visit Diode Dynamics and purchase the following:
License Plate LightsNote: I personally purchased the “pure white” bulbs over the “cool white”. I think they are a bit brighter than the cool white look. The choice is entirely yours and what colors to pick. - Step 2: Open your trunk and observe the license plate lights housing. There is a tab on the inside (license plate side) of the housing. Using your finger, pull the tab to the opposite side and pull down. The license plate light assembly will come right out. Turn the light socket counterclockwise to remove the light socket. Pull out the factory light bulb (Pull straight out. These bulbs plugin not twist in). Install the new LED light into the light socket. Re-install the light socket by lining up the tabs and turning clockwise to lock them into place.
- Step 3: Re-install the license plate light assembly by sliding in the end opposite of the locking tab first (the outside/tail light side). There is a slight tab that will hold it in place. Then simply push up and lock the license plate light assembly back into place. Repeat all steps for the other side. Doesn’t get much easier.
The LED Difference – Turn Signals Front and Back Installation
When switching over to LED turn signals on a vehicle that came stock with bulbs, a change to the electrical system needs to be made. It only involves changing a relay fuse and is extremely easy to do.
LED lights as we learned earlier use much less energy than traditional bulbs. Your vehicle will detect when a turn signal bulb has burnt out. The vehicle’s electrical system senses that fewer amps are being used, and your turn signal will hyper blink on the dashboard. Rapid turn signal flashing on the dashboard will occur, telling the driver that a turn signal is not working, and more than likely needs a bulb replacement.
When switching these turn signal bulbs to LED lights, your vehicle is sensing the extra low current from the LED lights and will react as though the light bulbs are burnt out, and your car will engage hyper blinking when using the turn signals. To rectify this, you must change the Flasher Relay on the fuse box to an LED Flasher Relay.
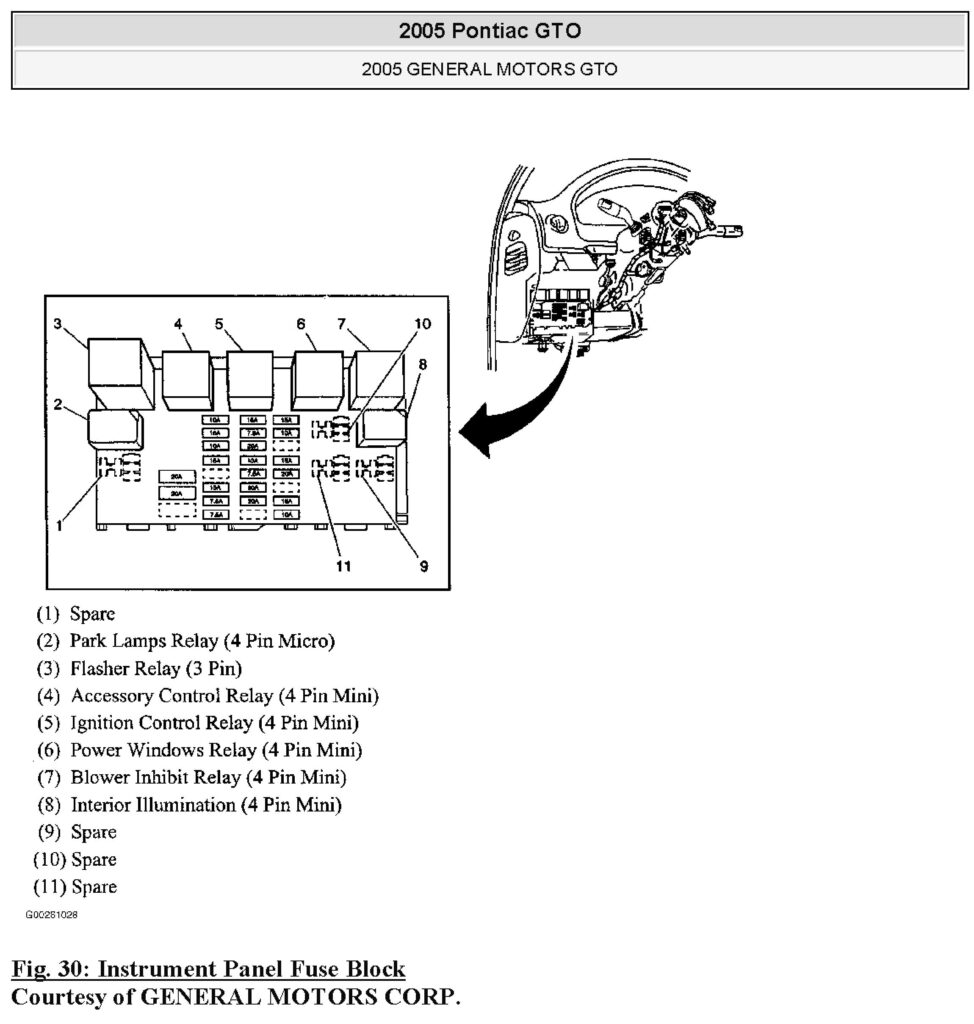
This Relay is extremely simple to replace. The fuse box on 2005-2006 Pontiac GTO’s is located on the driver’s side, under the steering column. Pull down the cover under the steering wheel gently from the top. There are locking tabs on the left and right sides of the cover. Lower the fuse box panel cover, you do not need to completely remove the cover. On the left side, you will see the fuse panel.
| Note: Do not replace the Flasher Relay unless you have replaced ALL of the turn signal bulbs with LED Lights. You can not replace just the fronts or back. Both front and back must be replaced at the same time along with changing the Flasher Relay to an LED Flasher Relay to prevent hyper blinking and ensure your turn signals are working properly. |
Installation:
- Step 1: Visit Diode Dynamics and purchase the following:
LED Flasher: CF15
Rear Turn Signals
Front Turn Signals - Step 2: The front turn signals should be fairly easy to access. On the driver’s side, you may have to remove the factory air box to get access to the turn signal bulb. Owners with K&N Cold Air Intakes should not need to remove anything. Turn the turn signal bulb counterclockwise to remove the bulb and socket from the headlamp assembly. Simply twist out the factory bulb out of the socket and replace it with the new LED light. Re-install the socket into the headlamp assembly by lining up the locking tabs and turning clockwise to lock them into place. On the passenger side, you may need to remove the battery to access the turn signal bulb. Smaller hands have an advantage here. Repeat the previous steps to install your new LED light.
- Step 3: The rear turn signal bulbs are accessed the same way the taillights and backup lights were replaced. Open the trunk and remove the two (2) Phillips head screws that hold in the tail lamp assembly. You may want to use masking tape on the paint around the assembly before continuing to the next step to prevent paint damage. Gently pull the end the screws were in out, but not all the way. Push the tail light assembly forward and at a slight angle to remove the tail lamp assembly from its locking tab. Put a towel under the tail light assembly and let hang. Remove the turn signal bulb and socket by turning counterclockwise to release the socket from the tail light assembly. Twist out the factory bulb and replace it with the new LED light. Re-install the bulb and socket by lining up the locking tabs and then turn clockwise to lock the bulb socket in place. Re-install the tail lamp assembly by locking in the tab first, then push the tail lamp assembly into place, lining up the holes for the two Phillips head screws. Before tightening the screws, be sure the lip of the trunk weatherstrip is slightly over the tail lamp assembly. Install the two Phillips head screws and hand tighten. Repeat all steps for the other side.
- Step 4: Replace the Flasher Relay on the fuse panel with the new LED Flasher Relay as per Fig. 30 in the instructions above. This will prevent hyper-blinking and ensure your turn signals are working properly.
Conclusion
Changing the exterior lights on your vehicle to LED lighting will greatly improve your night driving vision. I realize this may be a costly upgrade, but how much is it worth to you to be able to see the road better, and know other drivers can see you? LED lighting uses less energy and does not need to warm up to become bright. Your car battery will thank you, and your eyes will thank you for the improved night vision. Do your own homework. Watch the video’s supplied by Diode Dynamics. Don’t be fooled by cheap imitation halogen bulbs that claim to be just as bright as LED lighting. As the sayings go, “The proof is in the pudding”, and “You get what you pay for”.
For more LED lighting alternatives, check out the LED Lighting Interior article found on this website.
| Note: I hope you found the information on this website useful. Many hours of time and research have gone into building this website. Please feel free to donate to Mark Quitter Racing. Donations will be used to pay for website services that are used to keep this site current and online. Your support is greatly appreciated. |
With the diode dynamics led tail/brake lights, did you have to add inline resistors to fix the no traction control and cruise control issue?
Submitted on 03/16/22 at 11:51 am
I personally have never had this issue using the Diode Dynamics products. I have read about others having problems switching to LED lights causing traction control and cruise control to not work. But to be honest those issues seem to be from older LED products or cheaply made LED products from years back. A lot has changed in the LED market in the last 10 years and has improved greatly just in the past 5 years. That is the nice thing about Diode Dynamics products, just plug and play. No resistors are needed. You can always call Diode Dynamics to ask them if they have encountered any issues.